In this updated ContentStudio review, you’ll find everything about ContentStudio social media and content marketing toolkit, such as how to use ContentStudio, features, pros & cons, and even alternatives.
You think it’s good to have ContentStudio for your social media and marketing campaigns, right?
Well, ContentStudio is another social media marketing tool out there……
But, realistically, It is more than just a social media marketing tool.
Today, in this ContentStudio review, you’ll find EVERYTHING about ContentStudio.
If you’re concerned about…
-
Whether you should use ContentStudio for social media campaigns of your business or clients
-
Why you should choose ContentStudio over other popular social media marketing tools like Hootsuite, Buffer, Agorapulse, Plannable, etc.
-
Whether ContentStudio can make a difference to your business if you use it
-
And… Whether ContentStudio is worth it, invest your hard-earned money and precious time.
Then, you’re going to find answers for all of these and more questions you may have in your mind in this ultimate tutorial and review on ContentStudio.

How to Read this ContentStudio Review + Tutorial
Like most of my other articles in Pitiya, this post about on ContentStudio review is also lengthier. However, it contains over twenty sub-headings that cover each inch of ContentStudio.
I did my best to put it together as far as possible so you can access them in one place. Because of that, this article contains over 7,000 words. (Have you ever read a post that lengthier?)
Therefore, I put essential sections into the Table of Contents below. Click on each heading and subheading text to jump to each section of this ContentStudio Review + Tutorial.
ContentStudio Review
ContentStudio has seven main tools. They are,
- Content Discovery
- Composer
- Planner
- Automation
- Analytics
- Inbox
- Influencer search
I will discuss each of them in this ContentStudio.io review.
Workspaces
ContentStudio is a versatile social media and content marketing toolkit. It provides many features and tools to help you manage your social accounts. Hence, you might wonder how to manage multiple brands and certain groups of social accounts.
ContentStudio’s Workspaces allow you to manage multiple brands more efficiently without confusion.

Create workspaces for your brand and businesses separately so you can manage them better and work efficiently without headaches.
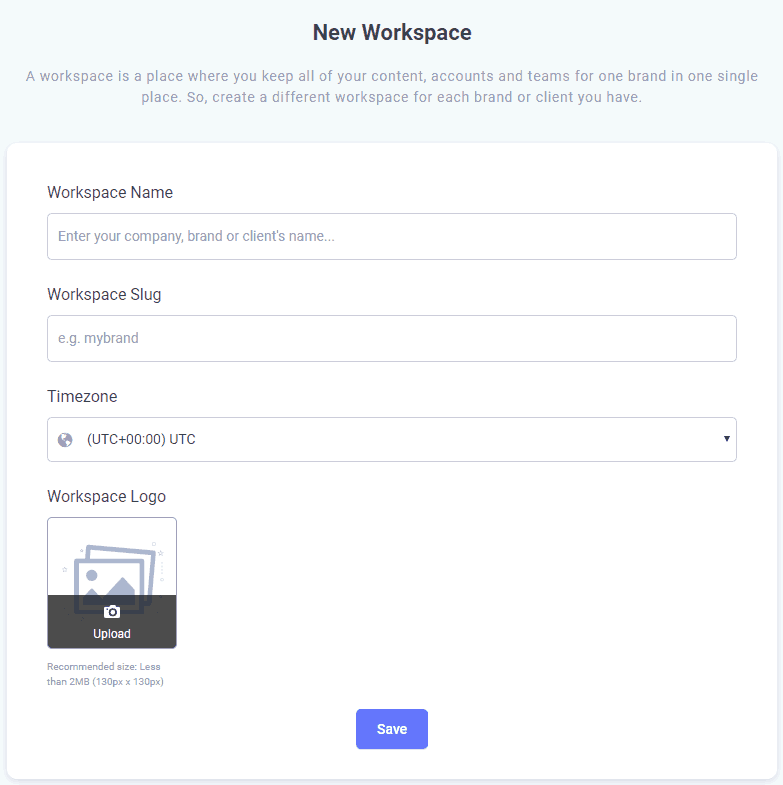
For example, I created a Workspace for Pitiya and managed all social accounts and sites related to the Pitiya brand in that Workspace.
Content Discovery
I’d say the “Content Discovery” tool in Content Studio is the heart of it. It’s where you will find relevant content to share on your social media profiles and blogs.
Content Discovery tool is kind of similar to “Buzzsumo,” but with better integrations and features such as posting to the blog, adding to evergreen campaigns, etc.
You will get access to Content Discovery without having to set up anything. However, if you want to add custom websites to “Content Discovery” in ContentStudio, you must specify the sites.
Sources
Here’s how to add custom sources to ContentStudio.
Step 1. Click on your “Profile” image in the top right corner and select “Sources.”

Step 2. ContentStudio sources library includes millions of sites and RSS feeds. If you wish to add a new source to your custom topics library, click on the “Add a new source” button at the top. Then you will see a popup window like this.

Add New Web Source
You can manually specify a web source in three different ways.
- Add by Keyword/Domain
- Add by RSS Feed URL
- Add by uploading your OPML/TEXT file
Before adding a website feed URL, you can use the “search by keyword” search feature to first confirm that the particular blog you want to add to your Content Discovery feed isn’t already attached.
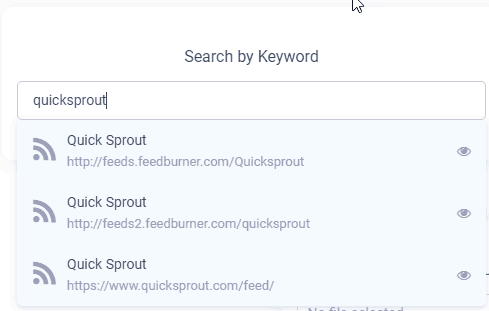
You can preview the blog feed by clicking on the “eye” icon if it’s already been added.

Add RSS Feed
The best way to ensure ContentStudio will catch up with all the past and future blog content is by adding its RSS feed URL.
RSS is an acronym for Really Simple Syndication. RSS is a web content syndication format. Therefore it doesn’t follow search engine robot rules such as index tags.
This way, ContentStudio won’t miss any future blog posts as, in general, the RSS feed is updated whenever the blog is updated, even though it’s set as “Noindex” for search engine bots. Learn more about the specification on RSS 2.0 over at the Harvard Cyber website.
How to find the RSS Feed URL of a blog
According to CMS Usage statistics, most blogs in the world are powered by WordPress (self-hosted), BlogSpot, Tumblr, WordPress (hosted), or Magento content management systems. (among them, self-hosted WordPress is far ahead of others. So, most websites and blogs you see are created using WordPress) Here are example RSS feed links for each blogging platform.
| Content Management System | RSS Feed Path Address |
|---|---|
| WordPress | /feed/ |
| BlogSpot | /feeds/posts/default |
| Tumblr | /rss |
| Magento | /feed |
| Live Journal | /data/rss |
| Joomla | /feed |
| Drupal | /rss.xml |
| Typepad | http://feeds.feedblitz.com/*yourusername* |
Despite Typepad, enter blog address before RSS feed path address to generate RSS feed of posts. Ex: www.pitiya.com/feed/ (WordPress Self-hosted)
OPML/TEXT file
OPML is the acronym for “Outline Processor Markup Language.” Mainly it contains a set of RSS feed URLs.
Download the OPML editor to your computer over here and create an OPML/Text file with a set of RSS feed URLs for ContentStudio.
Additionally, you can use this online OPML generator to create OPML files or .XML files.

Here’s what the XML file will look like after hitting the “Generate” button.

Source Library
Source Library is where you will see all available web sources that fetch content for the Discovery feature.
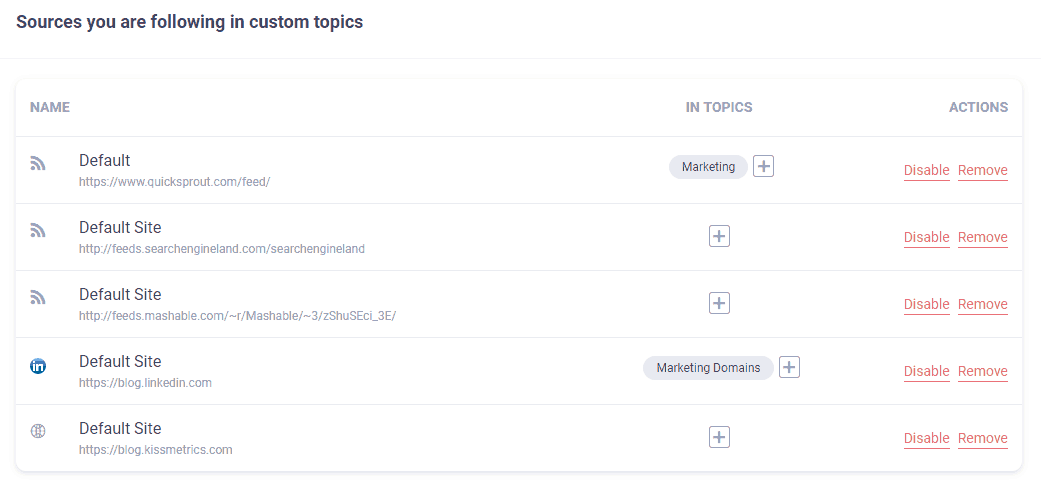
As you see, I have added LinkedIn domains to a custom topic (‘Marketing Domains’). You can turn on/off each source by enabling and disabling it, adding blogs to custom topics, and finding blocked sources!
Search Content
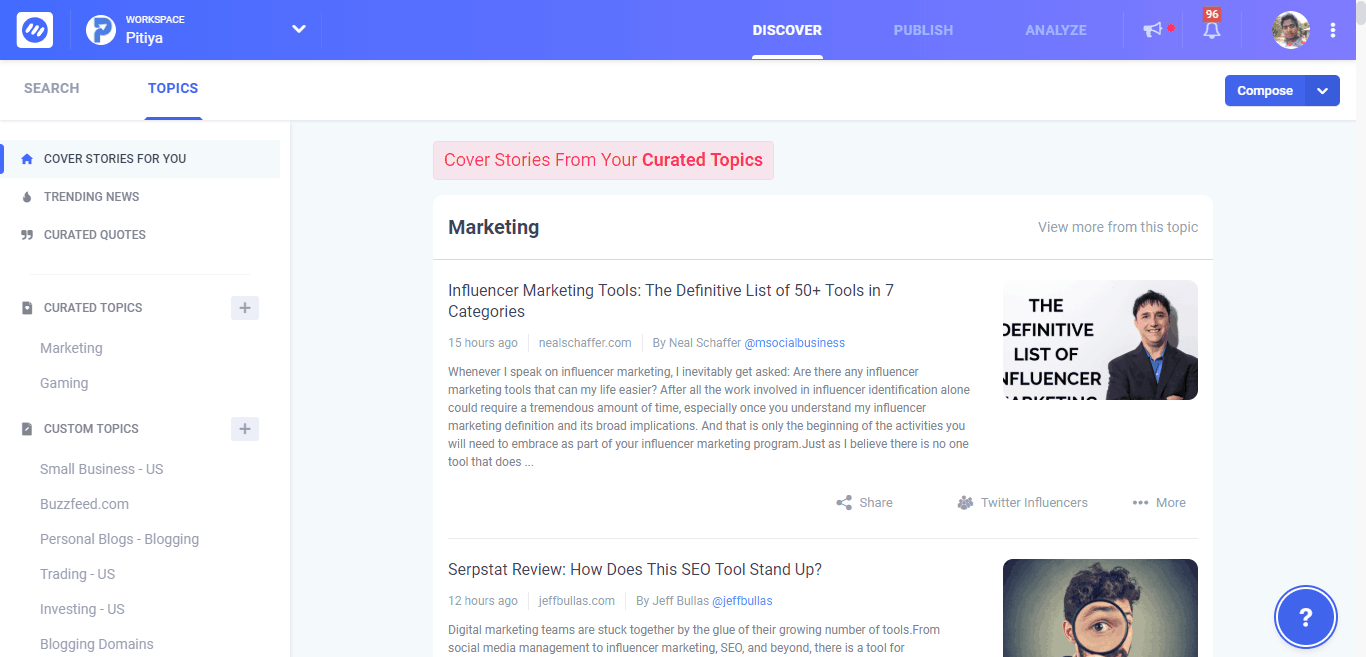
ContentStudio frequently searches for fresh content and categorizes them accordingly to the topics and niches. You can even follow those topics to get insider updates quickly on your industry.
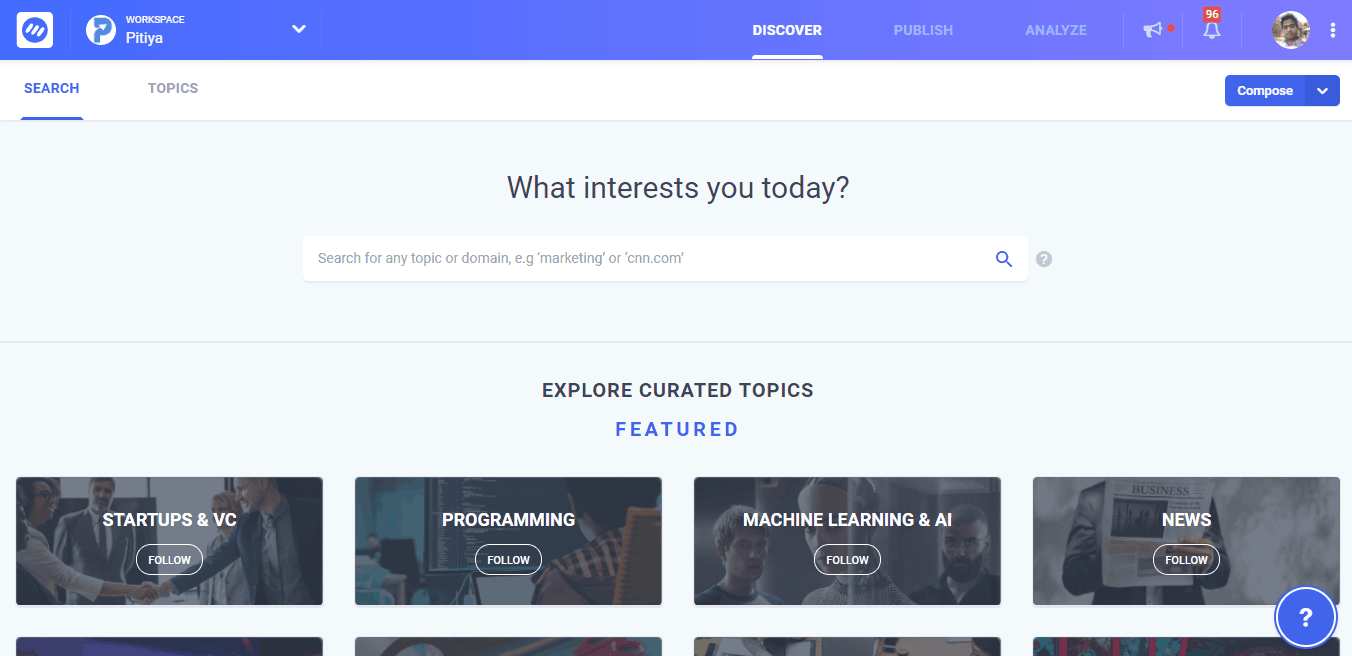
Topics
Remember we set up custom sources earlier?
In this section, you can find not only curated content but also trending content as well!
Content Types
One area where ContentStudio’s Discovery feature is ahead of most other content discovery tools is the number of platforms it supports. Here are the platforms that ContentStudio supports.
- Web Articles (News websites, blogs, etc.)
- YouTube
- Dailymotion
- Flickr
- Imgur
- Giphy
- Pixabay
Filter Options
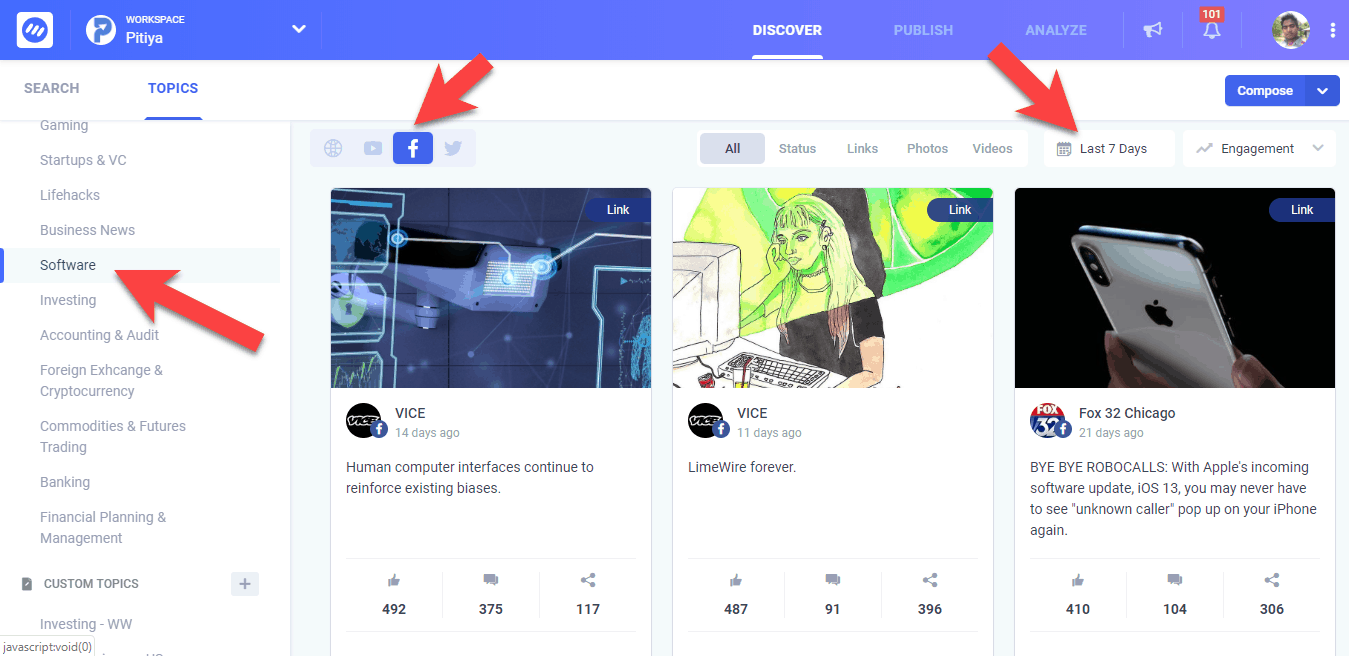
You may want to know which sorts of news have become popular in Canada in the Spanish language last hour.
You can find them very quickly if you use ContentStudio’s Discovery module.

Find Facebook posts related Software industry with high engagement in the last seven days.
Search Content
You can find certain content by using the search box. Here are the advanced search filters.
- Search by a keyword: marketing
- Search by a phrase: content marketing
- Search by site: techcrunch.com
- Search by author: author: Sarah Perez
- Search by the author in a site: author: Sarah Perez && site:techcrunch.com
Also, you can search keywords within Title only or title and body. The second option will take more time but fetch more content.
Related Content
ContentStudio search box has “auto-suggest” feature. This means you will be suggested related keywords and websites whenever you start typing a keyword.

Details and Actions
View Options
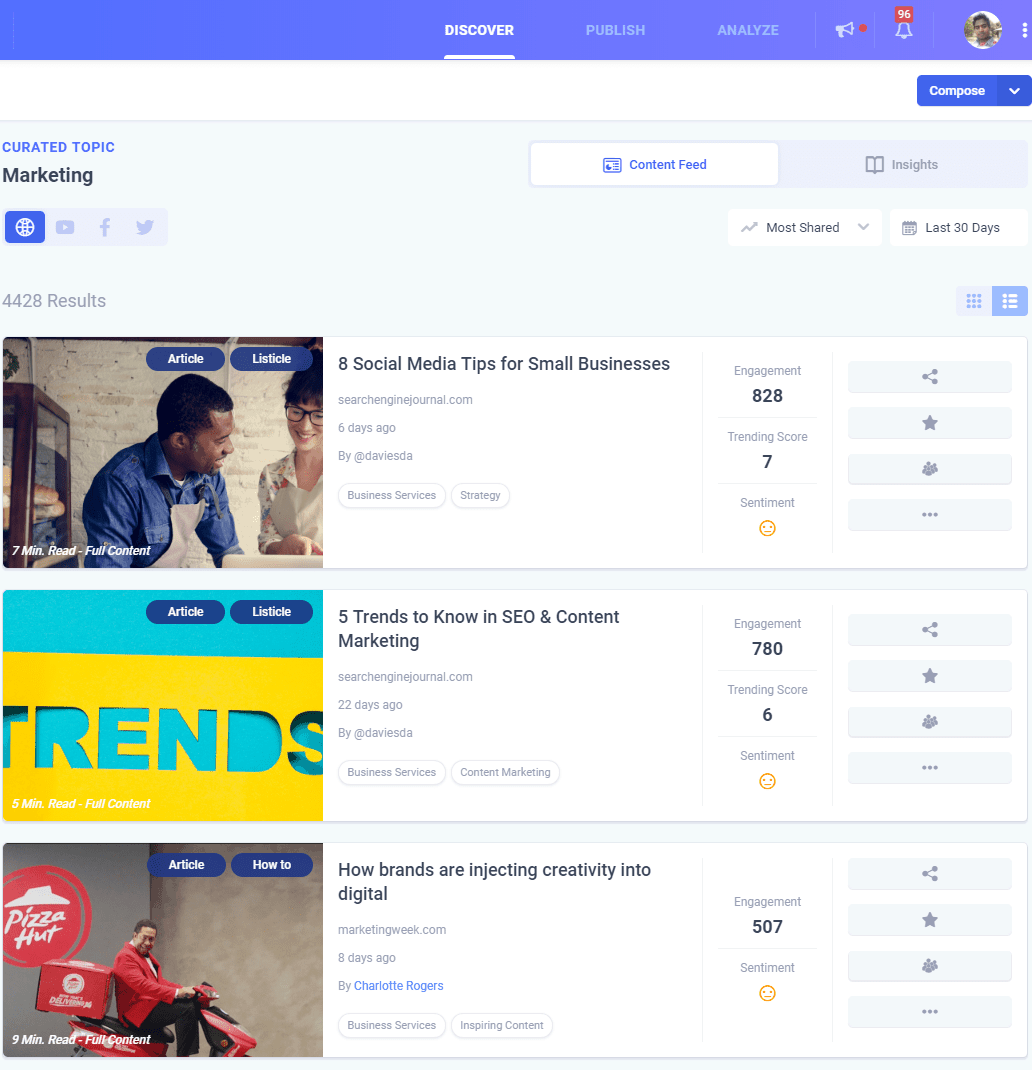
There are two ways to view content on ContentStudio.
- List View
- Grid View
Article Details
Under each web article, you will see details such as the number of total social media shares on Facebook, Pinterest, and LinkedIn and Trending Score, which is built on some factors.

Preview Article
By clicking on the “Eye” icon, you can preview the article inside ContentStudio.

Click “View Original Article” to open the original article in a new tab.
Twitter Influencers
Another convenient feature in the ContentStudio Discovery module is the ability to find Twitter Influencers.
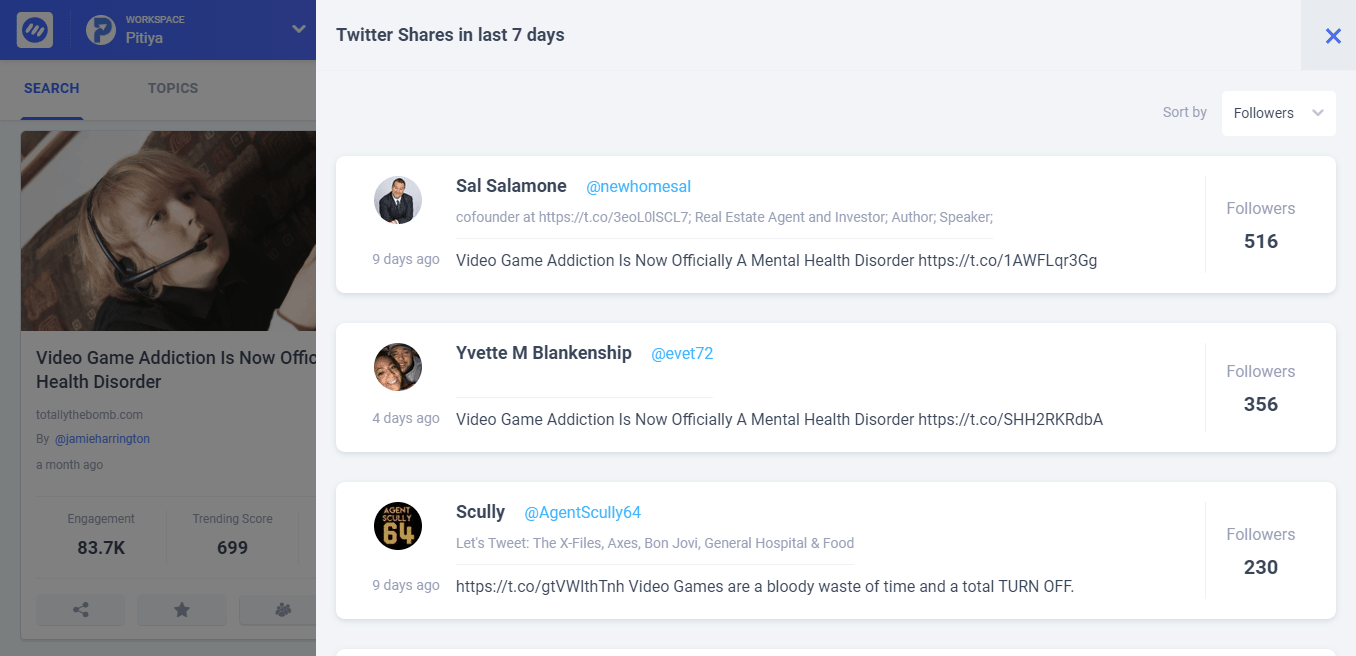
These are Twitter users who are interested in the particular content. You can reach them to pitch your content to get your piece of material shared with their followers. I have already discussed these methods in this article about Twitter tools. Check ContentStudio and Ninja Outreach sections to find out how to implement this.
Domain Options
If you’d like to see more content from a particular domain, click on the yellow three dots and then click on the “All Articles” option.

Or you can block the particular domain globally. You can see blocked sources under Sources >> Source Library >> Blocked Sources.
Add to Favorites
Sometimes you may encounter content you want to read or curate later. Simply create a new Folder under the “Favorites” tab and content to favorites.

Save to Pocket
You can also save web articles and videos to your Pocket account.
Share Articles
Before you start sharing articles on your social media pages/profiles and/or blogs, you must connect them to ContentStudio.
Currently, Facebook, Twitter, Pinterest, LinkedIn, Tumblr social networks, WordPress, Tumblr, and Medium blogging platforms are supported.
You can authenticate your social profiles/pages by navigating to Settings >> Social Accounts.

Note: You can manage unlimited Pinterest boards on each Pinterest account. (each Pinterest board doesn’t count as a social profile)
You can change the “Queue Time” and times posts in the queue are planned to be shared.
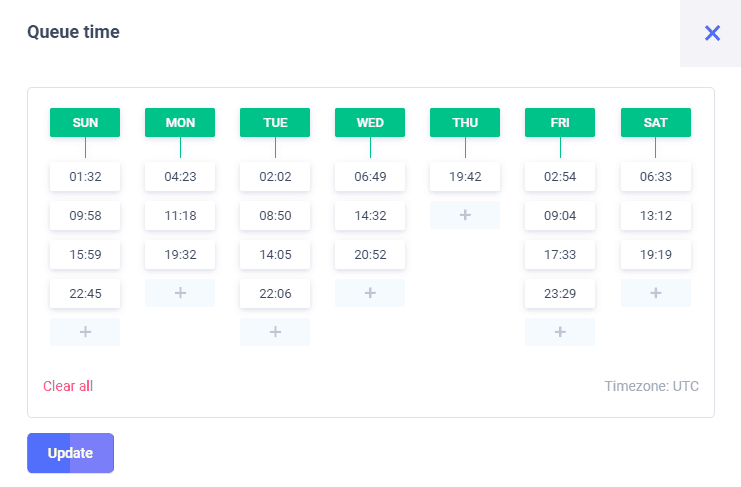
By default, ContentStudio adds optimal times to share content on your social accounts. However, you can add or remove each spot as you want. Similarly, you can connect your blogs to publish content.
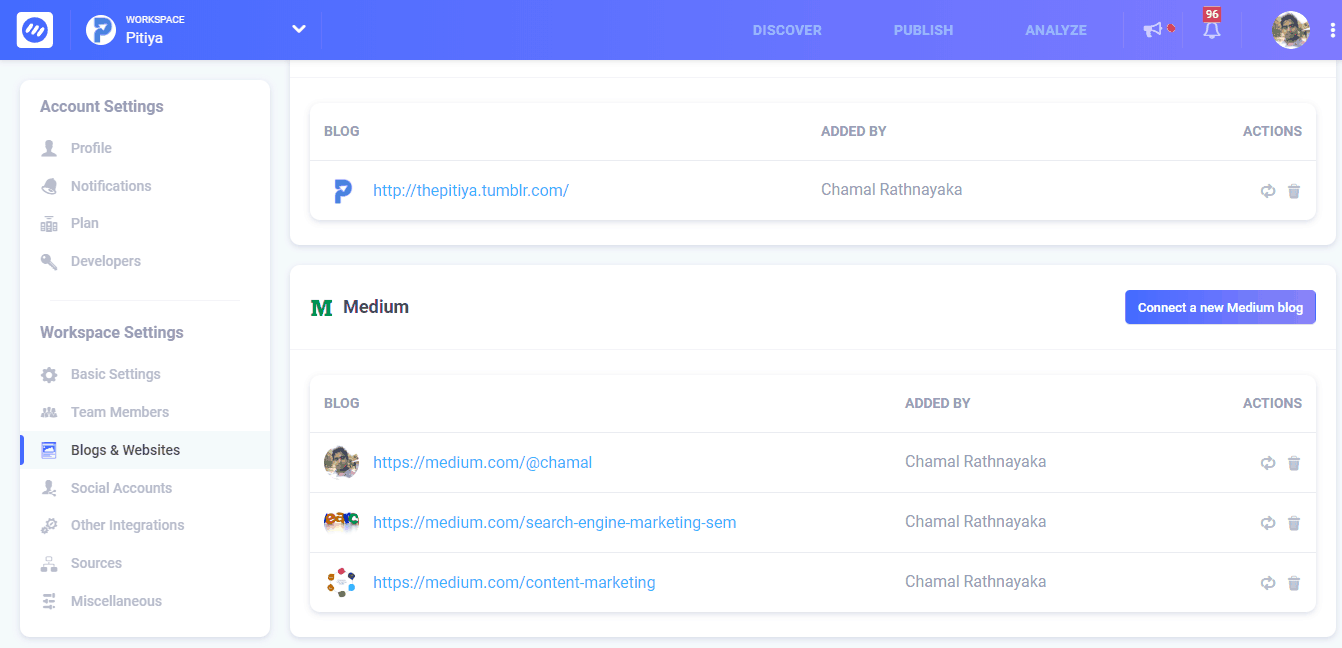
Share Articles on Social Media

Once you have connected your social profiles and pages, you can start sharing content on the Trending section of Content Discovery.

As you see in the above screenshot, there are four sharing options. If you selected “Queue,” which is set by default, your content would be moved to the content planner, and after that, it will be published according to the timing in Queue.
Evergreen Queue is a pool of content where each content will be shared again after other content has been shared. I will talk about it a bit more in the Automation section.
ContentStudio, by default, shortens your links so that it can analyze performance. In addition to default URL shortening, you can connect other link shorteners and set not to shorten URLs if you would like to.
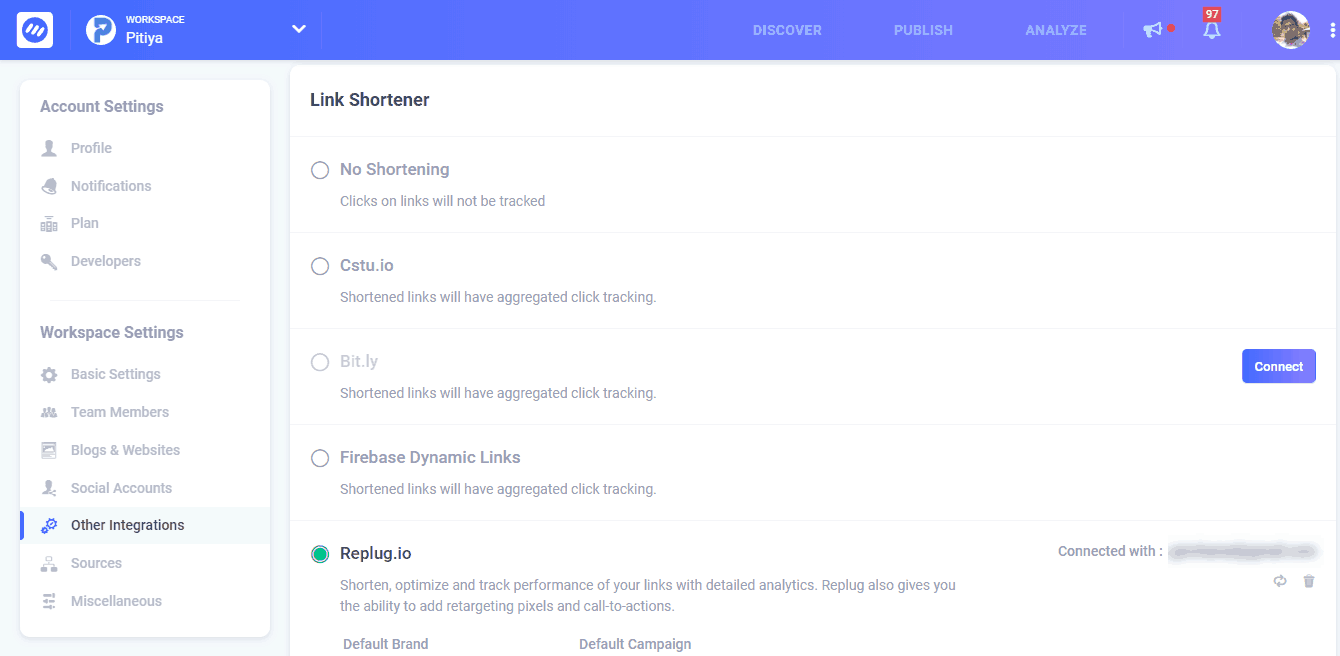
Another feature that I guess most people would find important is embedding UTM tracking in links.
You can create a UTM Preset in “UTM Tracking” under Miscellaneous.
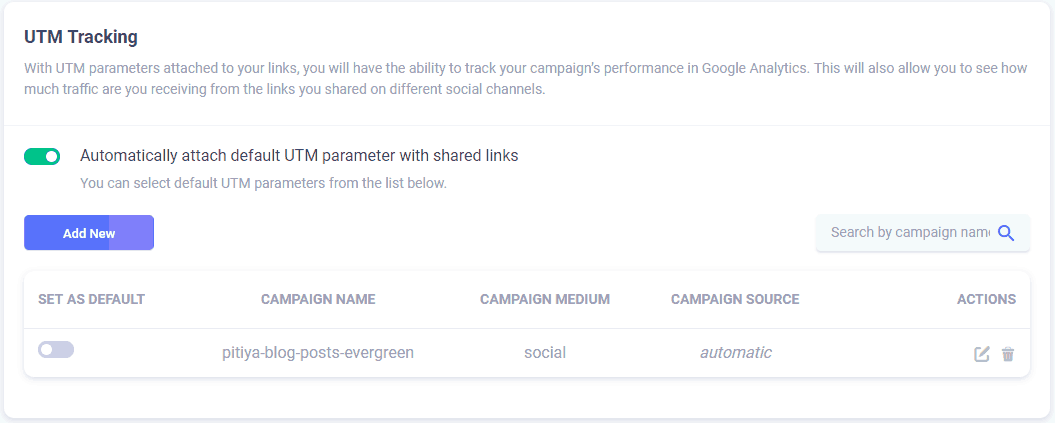
Even if you’re sharing other people’s content, add UTM tracking to links because it will help the webmaster, and you will get attention.
Saved Hashtags
Another beneficial feature is “Saved Hashtags.” Adding relevant, popular hashtags to your posts will increase organic reach and get more likes, retweets, and traffic to your website.
ContentStudio lets you easily add relevant hashtags for your social media posts. One key benefit here is that you can easily categorize a set of relevant popular hashtags and add them instantly to your social posts. You will save time and make your social posts, particularly Tweets, appealing and address the target market.

Once you are in the social post editor, you can easily use the saved hashtags.

Add images, videos and emojis are other optional settings in the ContentStudio post editor. I’d suggest utilizing Emojis well to increase engagements.
Publish Articles on your blog
This is kind of a similar feature to “reblog” on Tumblr. Even though Reblogs are essential to increase traffic and followers on Tumblr, publishing other’s content on your website or blog isn’t recommended as it could damage your SEO performance due to duplicate content issues. Learn more about Google Panda to examine more about duplicate content and SEO

However, it won’t make a big difference if your blog is built on a platform like Medium or Tumblr.
I will talk about this feature in the Content Curation section.
Note: Content curation and content duplication are two different topics.
Curated Topics (Default)
Currently, there are twelve default curated topic categories.
- Featured
- News
- Arts & Entertainment
- Technology
- Beauty & Fitness
- Health Conditions
- Travel
- Finance
- Science
- People & Society
- DIY & Home Improvement
- Food & Drink
Each main topic category contains multiple sub-topics so that you can easily narrow down targeting and find the most popular content.
Custom Topics
If you want something specific to be organized in your ContentStudio Content Discovery dashboard, creating “custom topics” is the best way.
Here are a few custom topics I’ve created for my reading and content publishing.
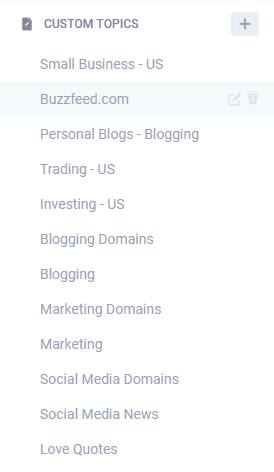
For example, I have created a custom topic to filter content related to ‘Blogging‘ of specific websites I would like to read. So, I don’t want to visit each website one by one and filter blog posts by the ‘Blogging’ category.

Create Custom Topics
Here’s by step guide to creating a new custom topic in ContentStudio.
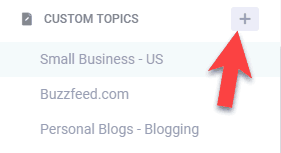
Step 1. Click on the “+” icon in Discovery.
Step 2. Give a name for your new custom topic. It should be short and resonate with what the custom topic is about. Ex: Fitness Blogs – My Competitors, US Politics, Olympic News – En_US
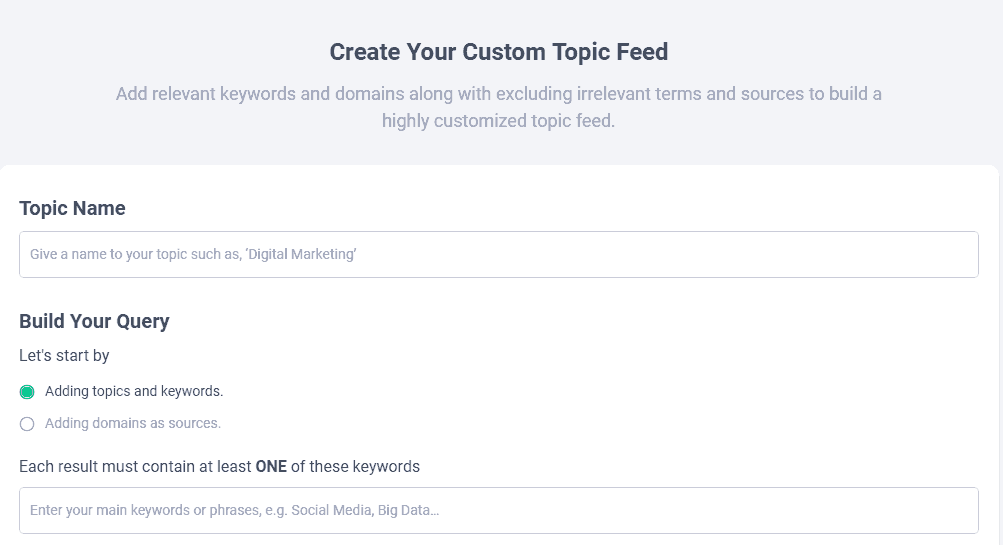
Step 3. Build your custom topic according to your needs. Use Exclude fields to filter out any irrelevant, low-quality content. For example, add blogspot.com into the ‘Exclude domains’ field if you wish to block content from BlogSpot blogs.
Here’s an example custom topic that will filter trending content related to Investing, the stock market, etc.
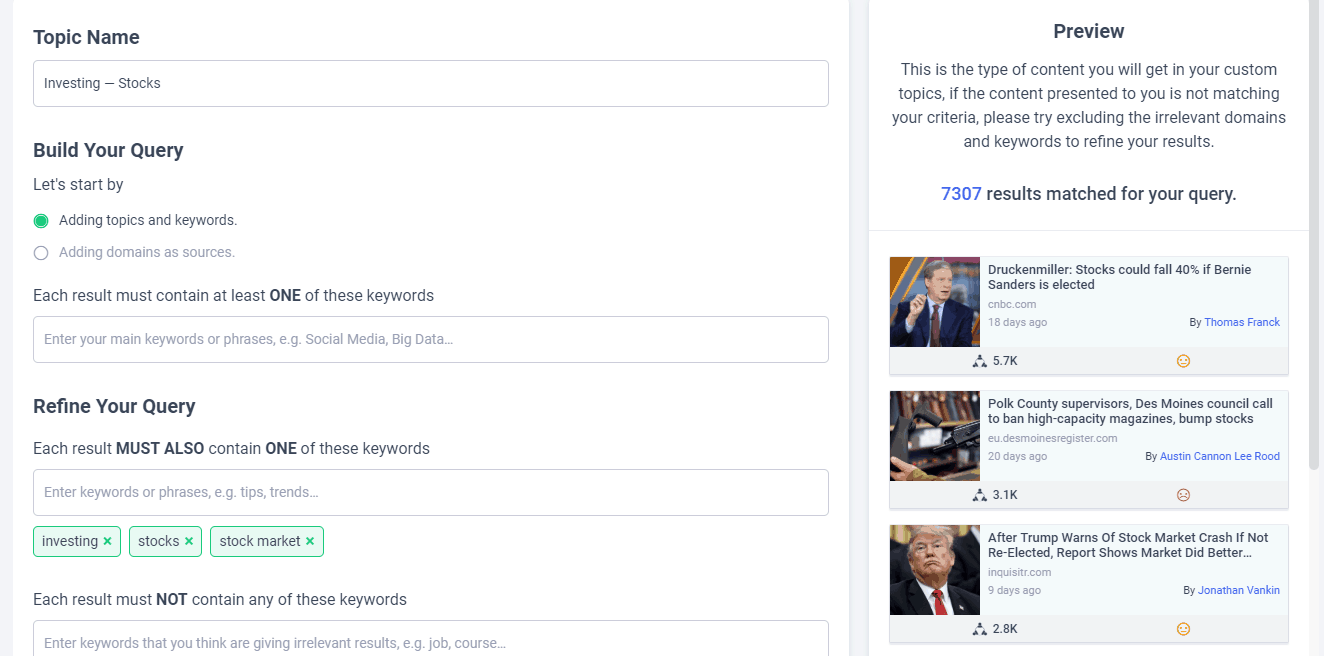
Narrow your targeting by using content filter options.

Feedly Contents to Custom Topics
If you use Feedly to save content you find over the Internet and organize your reading list, you can import them to your ContentStudio account and create custom topics based on them.
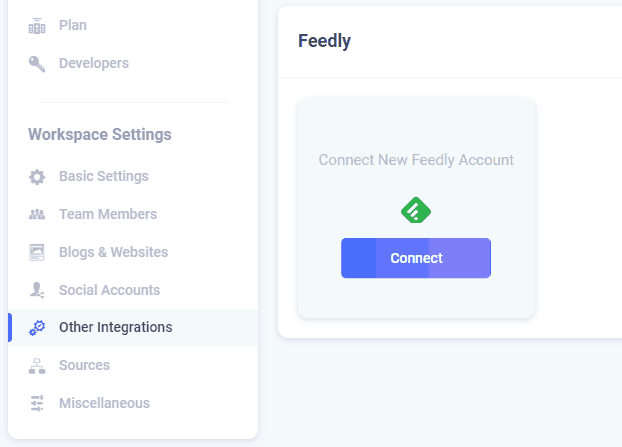
However, you must have a paid subscription to share content from Feedly to ContentStudio.
Composer
I have mentioned ContentStudio as an all-in-one content marketing tool. Well, the Composer in ContetStudio proves my point very fine.
If you’re a social media marketer, manager, or blogger, you’d like to manage all your social media pages on one page. (ex: sharing pictures, quotes, GIFs, videos, and links to articles you have published earlier to all pages at once.)
ContentStudio’s Composer is the most robust social media posting tool I have ever seen. Combining with Content Discovery makes sharing even more comfortable and quicker.
If you’re a blogger and have tons of other niche websites and want a way to find and publish relevant, helpful, and engaging content with your readers, Blog Post composing tool in Content Studio is your best option.
I will explain more about both options step by step…
Social Media Post
ContentStudio’s social media posting tool is potent. It means it includes tons of ways to add content, integrates with other tools such as “image editor,” which allows you to design custom images with your own watermarks, UTM tags to track which posts perform well on social networks, and settings to add custom and suggested hashtags to get more reach.
To be honest, there are tons of other features inside social media composer in Content Studio. I recommend you to sign up for ContentStudio free trial today and study them. (I bet you’ll be blown away!)
Here’s an example step-by-step short guide to creating a social media posting campaign inside ContentStudio.
How to create a social media posting campaign using ContentStudio from scratch
In ContentStudio Composer, click on the “Social Media Post” box.

Next, you will be seen the Social Post Editor.
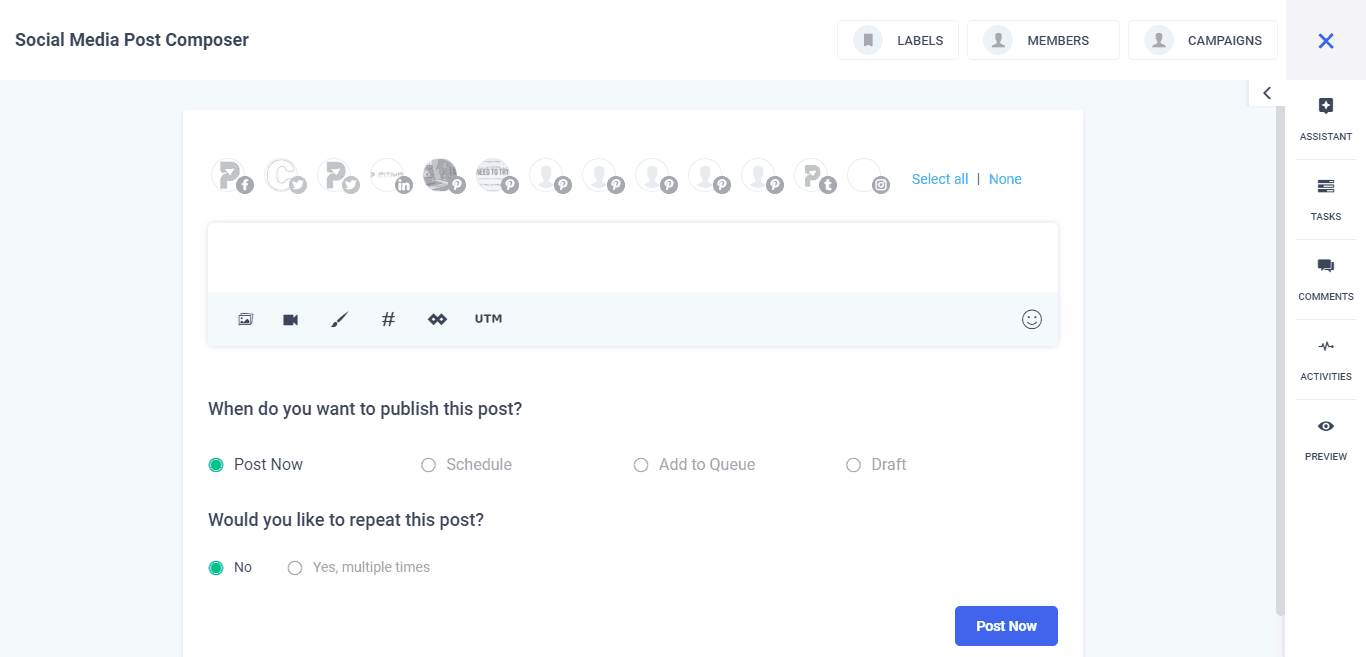
1. Search Content
If you’re managing social media accounts, you don’t need to worry about features other than Content. Because they are for Virtual Assistants or freelance social media managers, for example, you can create a list of tasks your social media account manager should follow and complete accordingly.
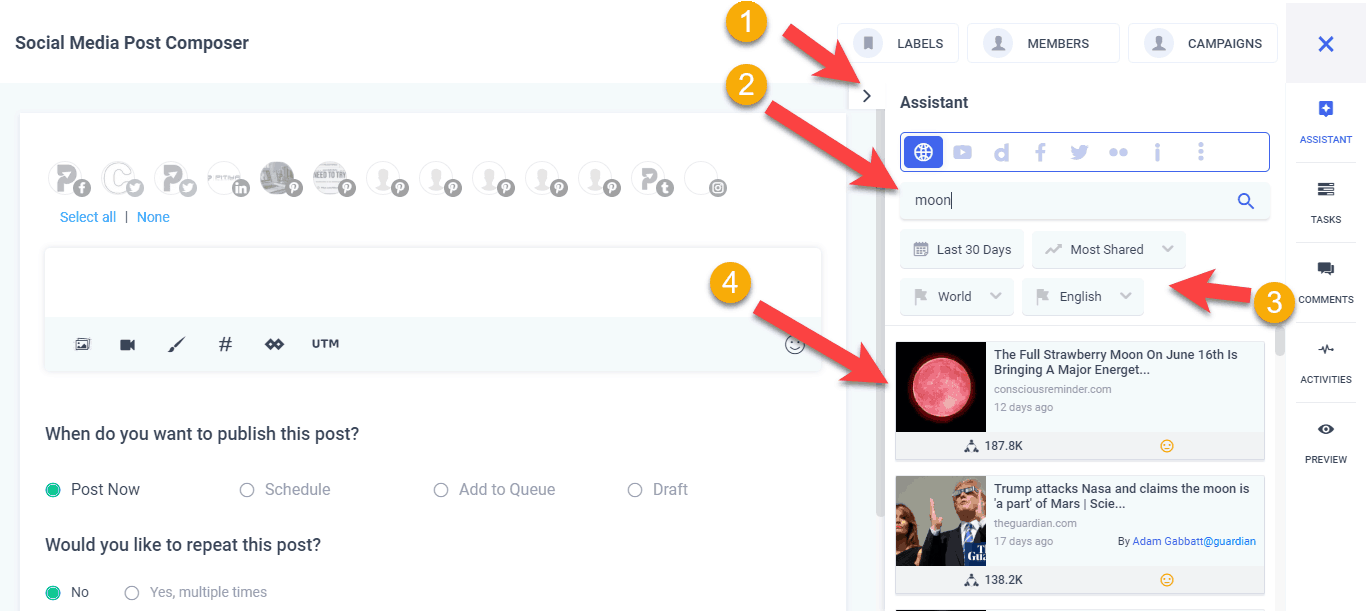
Currently, you can research content for your social media posts in 12 ways. They are…
- Articles (all blog posts)
- YouTube
- Dailymotion
- Facebook (quotes, status, videos, images, etc.)
- Flickr (Images are under CreativeCommons 3.0. Read more about image Flickr licenses here)
- Imgur (all funny and viral photos)
- Giphy (animated images)
- Pixabay (Royalty-free images)
- Quotes
- Pocket (Get saved articles from your Pocket account)
- Favorite (Saved items in ContentStudio Composer)
2. Find Content
Once you have selected the preferred source to get content from, enter your keyword phrase. For example, I have chosen web articles (mostly blog posts) and typed my keyword phrase, “moon.”
The reasons why I searched articles related to the “moon” are 1. It’s a trending topic in recent days 2. People frequently share discoveries related to space and deep space observations on their social profiles. 3. People are curious to know details about the moon due to recent incidents 4. High engagements on social media (ex: comments, shares, etc.)
By identifying viral blog posts, I can share them on my social networks and increase followers, engagements, and reach.
You can filter desired content based on options in the search module. One fantastic way is to filter content trending in the past 24 hours. (latest news)
Or, in fact, you can use this hack to get more reach.
- Filter content based on Most Pinterest shares (key takeaways: shared by the majority of women. (according to statistics, majority of Pinterest users are women))
- Select your religion (optional) Or select the default option, which is Worldwide.
- The select language your social media account belongs to.
- Select Pinterest in your social media accounts section. (Important)
- Share your post. (see instructions below)
Like Twitter, the key to getting more shares on Pinterest if you don’t have many followers is using the right hashtags. You can reverse-check repins and hashtags used on posting by copying and pasting article URLs on Pinterest. Once you’ve found the article to post on social media sites, drag and drop it into the editor.

3. Creating social media posts
Once you drag and drop an article post using the assistant tool, a social post excerpt will automatically be inserted. (ContentStudio intelligently gets a sentence or two from the blog post and adds it to your post)
You can also customize the content for each social channel separately.

Currently, there are a few ways to customize your social media posting content in ContentStudio. They are…
- Add more images (upload from your computer and phone)
- Add Videos
- Create a new image (Use ContentStudio’s image editor)
- Add Replug CTA. (Replug allows you to add CTA widgets, opt-in forms and retargeting pixels to links you share on social networks.)
- Embed UTM tags (Measure results in Google Analytics)
- Add custom source link(s)
- Add emojis
4. Preview social media post
In the end, you can preview your social post before publishing it. Click on each tab to see how each post might look on each social media profile and page.

Last but not least, publish your social post.
In a short time period, you can create a good set of social posts for each social network at once. The main thing you should consider is the relevance of the content. Then you can evaluate virality and trend.
Depending on each post, there are a few times to post.
Posting Times
Post Now: Publish the post immediately
This option might be the best if you run a promotion such as a giveaway, flash sale, and sweepstakes.
Because ContentStudio Composer allows repeat posting, you can easily create, set, and forget social media posts.
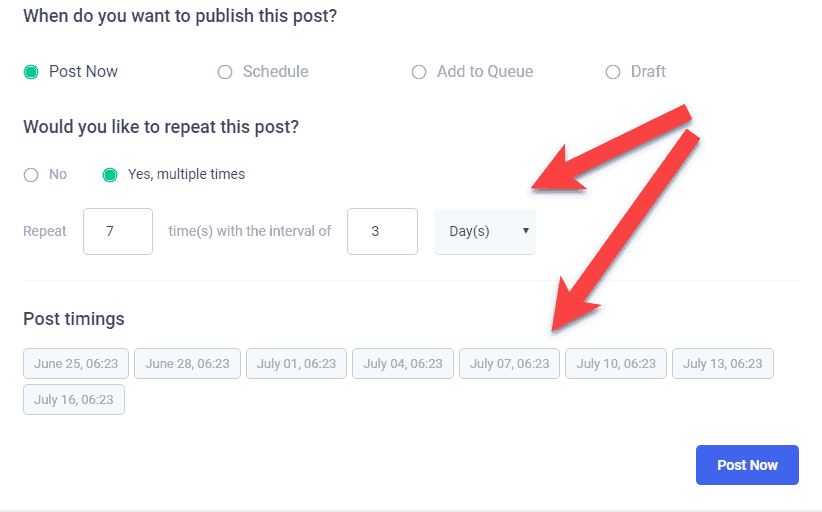
Schedule: Select a preferred time and date for publishing content
Sometimes you may want to create social media posts for unique campaigns such as Black Friday flash sales. There is a nitty workaround in ContentStudio combined with a “repeat posting” feature.
Here’s how you can schedule social media posts to publish 28 times with a gap of 14 days. (e.g., post once per two weeks)

Queue: Let ContentStudio share content for you at the right time
When connecting your social media accounts to ContentStudio, ContentStudio will analyze your followers and previous social media posts, and based on engagements, the queue for each account will be created.

You can use a tool like Followerwonk by Moz to find times when most of your followers (Twitter) are active.
Evergreen Queue: create a pool of social posts to share over again and again
Evergreen posting feature helps repost blog articles, text & picture quotes such as email marketing quotes, and Network marketing quotes repeatedly.
I don’t recommend this feature to be used for time-sensitive posts such as trending posts, news, celebrity stories, etc.
Blog Post
According to statistics and studies, there are over 600 million blogs in the world, and 77% of total internet users read blogs. You may use notable websites daily, such as Moz, Entrepreneur, New York Times, Huffington Post, Mashable, and Techcrunch, which are also blogs.
If you run a single blog, you can manage it efficiently. You can create content, promote it, and focus completely on your blog. However, when you maintain more than one blog, more problems start to happen, such as time management, content research, and blog management.
If you use WordPress (Self-hosted) CMS (content management system) to power your blog(s), you can use a WordPress plugin like ManageWP to manage multiple blogs. However, more problems occur if you maintain various blogs made with different CMSs.
ContentStudio has an excellent solution for it.

Now not only managing multiple blogs but also researching, creating, and publishing relevant content has become easier than ever with Blog Post composer in ContentStudio. It’s one of my secret tools in my arsenal, which I use for my niche blogs. (Another secret revealed! 😉 )
How to create a blog post using ContentStudio
I will show you how to create a blog post from scratch using ContentStudio. Please note that my method is just one way to create a blog post using ContentStudio. If you prefer writing content by yourself, you can do it. Unlike social media post composer, in Blog Post composer, you can just start creating the blog post without preselecting social networks.
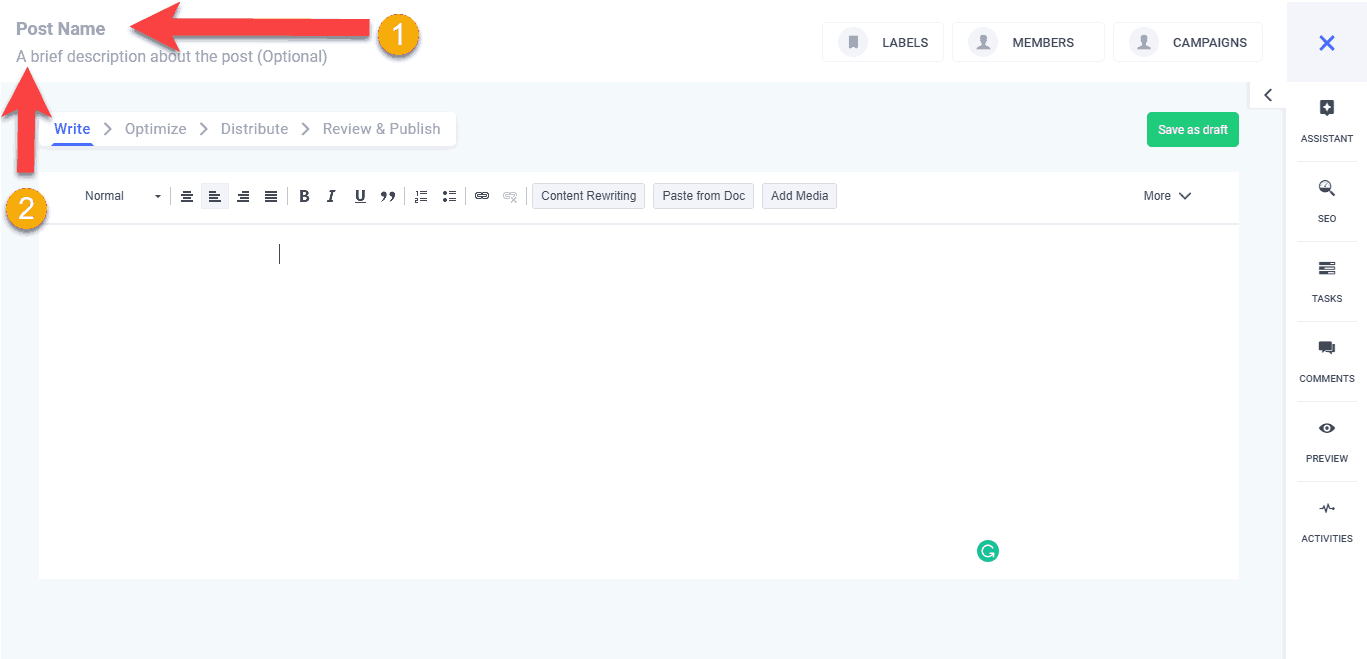
- Your post title or blog post headline is the #1 factor that tells its success of it. According to Copyblogger, 8 out of 10 people read the headline first and then consider reading the rest. So, make sure your blog post headline is not only attractive and attention-grabbing but also SEO-friendly too.
- Write a short description of your blog post for your reference.
If you’re unsure what to include in your headline, enter your keyword in the Content Discovery module in ContentStudio and find the most shared content. Those are generally highly popular because of the headline (and content, of course!).
Like in Social Media Post composer, select your content medium and enter a keyword phrase to find relevant content.

Select the “Full” option under ‘Post Length’ to filter articles with full content.
Click on the article’s title to preview it in an inside window.

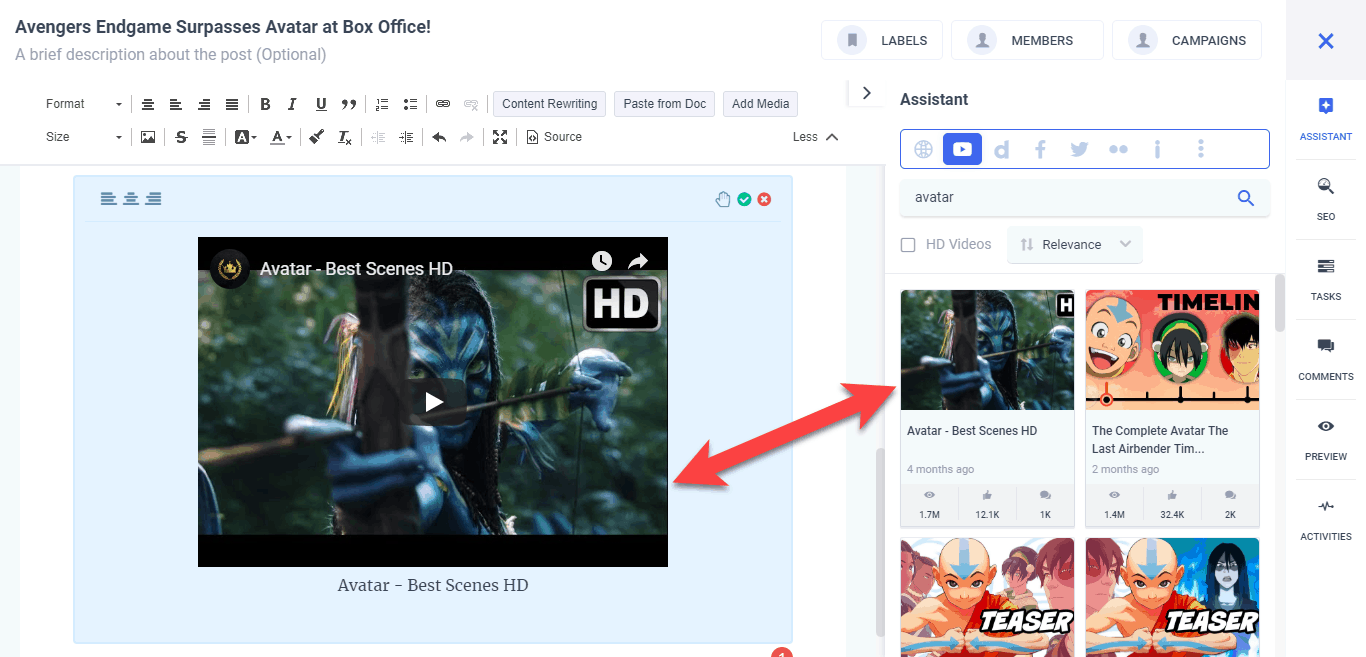
Like in a basic blog editor, you can change styles and add media to your blog post. One key advantage is that you can easily find relevant videos and images and insert them into the post instantly!
Use content rewrite options to make your content SEO-friendly. Currently, Quillbot, Chimp Rewriter, and Spin Rewriter tools are supported.
Preview your draft blog post to see what it looks like.

If everything looks good to you, optimize the SEO settings in the “Optimize” tab.

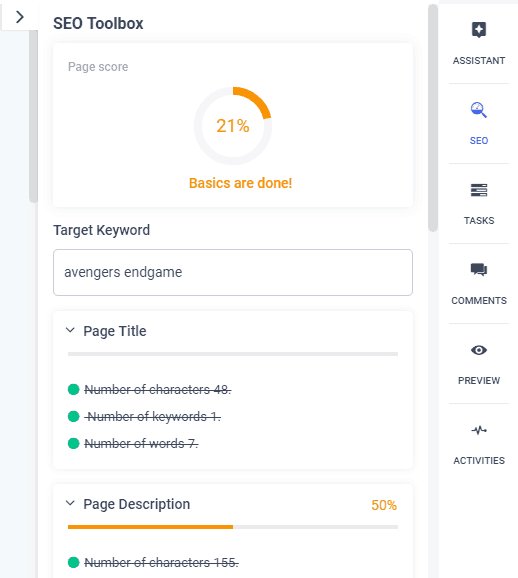
And don’t forget to check the SEO score of your blog post too. The higher score is, the better your article will be ranked on the SERPs. (One of the most excellent tools in Blog Post composer of ContentStudio)
Besides the SEO tool within ContentStudio, I recommend using a tool like Semrush to find keywords for your blog posts. (Read my Semrush review to learn more about the tool)
And if you edit content by yourself, make sure you check the article for grammar and punctuation errors. Sometimes, one comma mistake could change the core message of the article. My recommendation goes for Grammarly. You can find other grammar tools over here.
Once you are done editing your blog post and optimizing the SEO settings, and adding a cool blog post image, click on the ‘Next’ button.
Now here’s the cool part!… 🙂
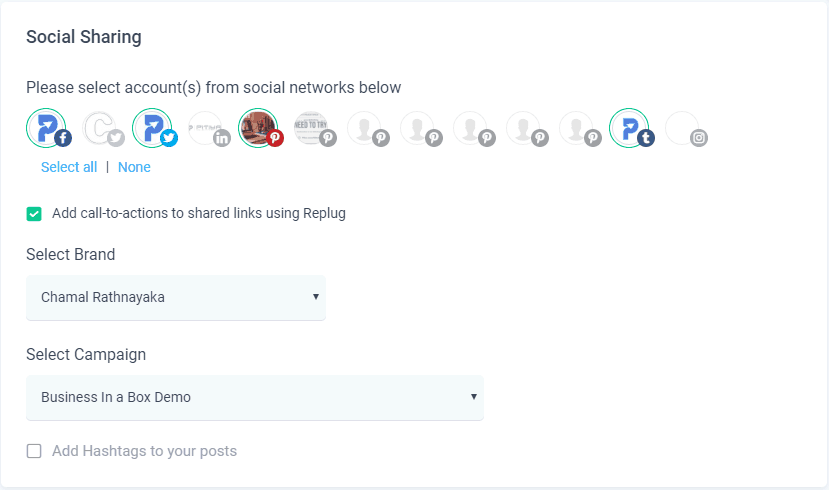
You can distribute your blog post to multiple blogs and also share the blog post on multiple social networks!

Select the relevant blog(s) you want to publish the article and the post status. Once you have selected those, scroll down a bit.
Content Rewriting
By default, content rewriting options are set to none. This means original content will be published.

There are TWO options you can use to rewrite original content. They are…
- Content Spin
- Content Translate
Content Spin
Currently, there are three content-spinning services integrated with ContentStudio.
- Quillbot
- Chimp Rewriter
- Spin Rewriter
The in-Built content spinner in ContentStudio won’t give you quality results. Most other premium content spinning software will spin content using spintax.
Each content spinning tools use different methodologies and technologies. However, using a content spinner for an authority blog is not recommended as even though it creates Copyspace-passed content, they lack engagement.
If you’re building a niche blog or an event blog, then content spin might be a good option for creating lots of articles in a short time.
Content Translate
Another handy feature integrated with Blog Post composer in Content Studio is Translate. Basically, you can publish the original article(s) in another language to get more eyeballs.

You don’t want to be a brilliant guy to use this feature. By translating trending content from the default language to another, you will get more traffic from search engines and social networking sites and more targeted visitors to your business.
If everything looks good, review your blog post.

Automation
Automation is one of the best features I want to discuss in this Content Studio review.
If I say the ‘Automation‘ feature in ContentStudio is the most useful feature, I might not probably wrong.
With ‘Automation’ tools, you can automate everything you’ve done manually.
In fact, once you have integrated the right tools and set up the proper targeting in automation, you can have run-on-demand websites and social media campaigns that drive traffic to your business and make money for you.
Just like most other things, before using social media automation tools, you have to master the process by doing manually.
On the other hand, if you have set up the wrong targeting in automation campaigns, you will get incorrect outputs. It means you have to steer clear of what you want to do with each targeting. (You can preview content before it’s published.)
Automation Recipes
ContentStudio has automation tools for each uses called Automation Recipes. For example, there are separate automation recipes for sharing videos on social media and blogs.
Currently, there are seven automation recipes. They are.
- Articles Links to Social Media
- RSS Feeds to Social Media
- Videos to Social Media
- Articles to Blog
- Videos to Blog
- Bulk Uploader
- Evergreen
You can entirely run your social media campaigns thoroughly using Automation alone. However, as I said earlier, it’s recommended to master social media posting manually or at least review your automated social media posts before publishing.
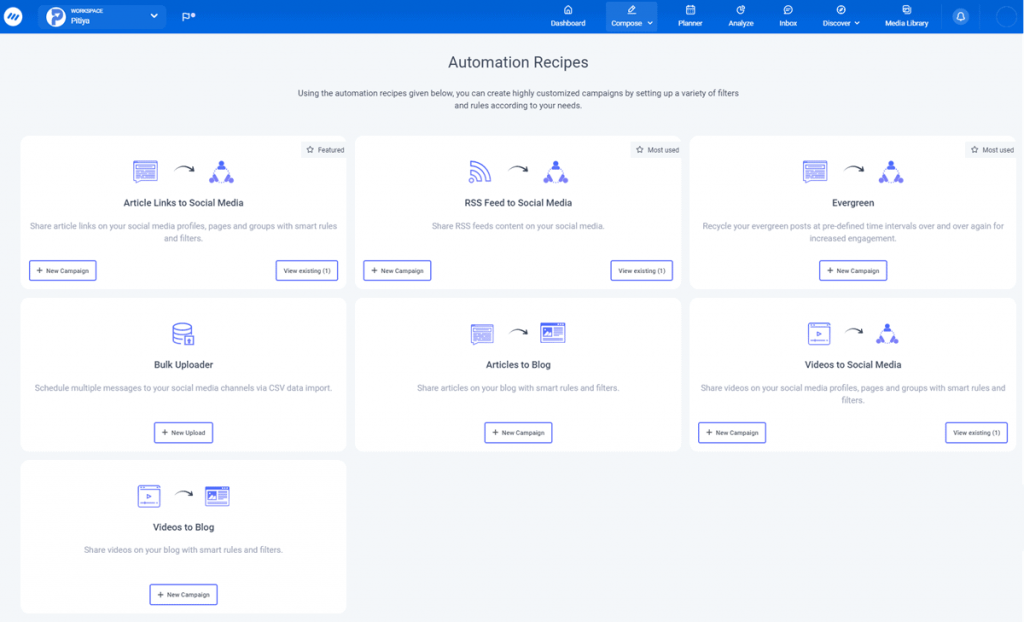
As you can see in the above screenshot, I have already created a few automation campaigns for social networks. I have some plans to use this tool for niche blogs as well. (I will update here with results soon)
How to create an automation campaign for social media
One of the best ways to increase followers, mentions, and brand awareness if you just started an online business is by sharing others’ content online.
Most social media marketers don’t understand that sharing other people’s content increases engagement, so traffic and customers own sites in the end. (Social media marketing is a long-term game.)
Not too long ago, I started a new Twitter account to test automation campaigns with ZERO Twitter followers. Entirely a brand new account.
Here’re just a few engagements of a few recent tweets.

Even though Twitter automation has been set to send each tweet periodically, they still get impressions. (Remember, with not too many Twitter followers)

Why not? More clicks too…

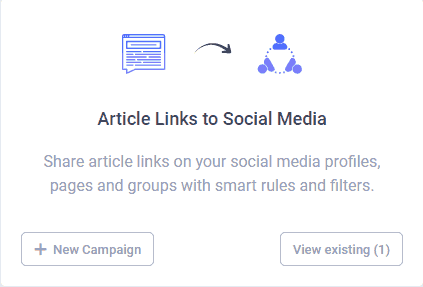
This section will show you how to create an “Articles Links to Social Media” automation campaign from scratch on ContentStudio.
Click on the “New Campaign” button under the “Articles Links to Social Media” automation recipe.
Provide a name for your new social media automation campaign.
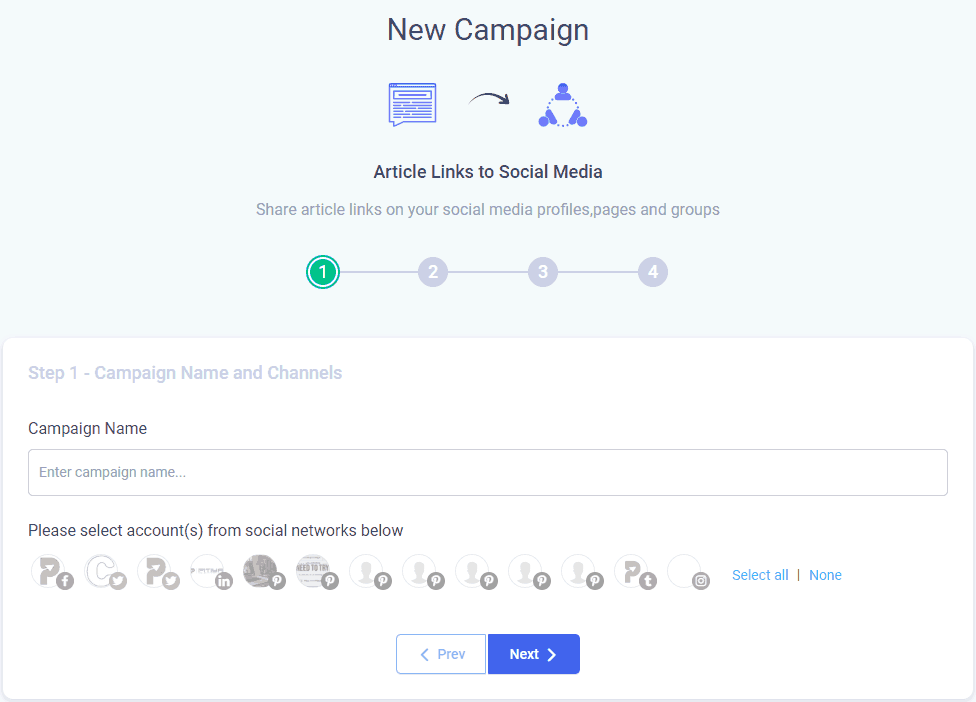
Select the social network(s) with which you want the particular automation to be associated.
In step 2, you can build your automation campaign.

You can use that option to fetch content if you already have set up custom topics.

There are even more options for you to narrow your targeting. If you’ve run a local business and helping your local business clients to grow their social followings, these options might be handy for you.

Use options such as “Post Age” and “minimum social engagement” to filter Hot topics in your niche.
Last but not least, here are my favorite settings in social media automation tools.

If you have integrated Replug with your ContentStudio account, you can display CTA popups widgets and opt-in forms in links you share! (with retargeting pixels so that you can create custom audiences on advertising platforms very easily.) Learn more in our Replug review.
It’s one of the secret ways I use these days to drive traffic to my service and affiliate links. Well, now it’s not a secret anymore! 😀
You have seen my tweets posted through the ContentStudio social media automation tool have high impressions even though my Twitter account has low followers.
The secret behind it is using hashtags correctly.
Use a tool like Hashtagify.me to find popular hashtags in your niche or industry.
Select ones with bigger ones and put them into Hashtags.org to identify their popularity. Use ones with at least 60 tweets per hour.
Or, actually, you can do some A/B tests to find popular Twitter hashtags.
Also, check “Mention Author” to tag the article writer in Tweets. That’s how I got the most retweets on my Twitter posts.
I selected the ‘Intelligent Post Variations’ option to make my social posts more appealing and engaging. Usually, when using intelligent post variations, ContentStudio will scrape a few sentences from the original article and use them as the post description. It makes the social posts shared by you manually too. (non-spam looking)
You can set times to publish social media posts in the fourth and last steps.
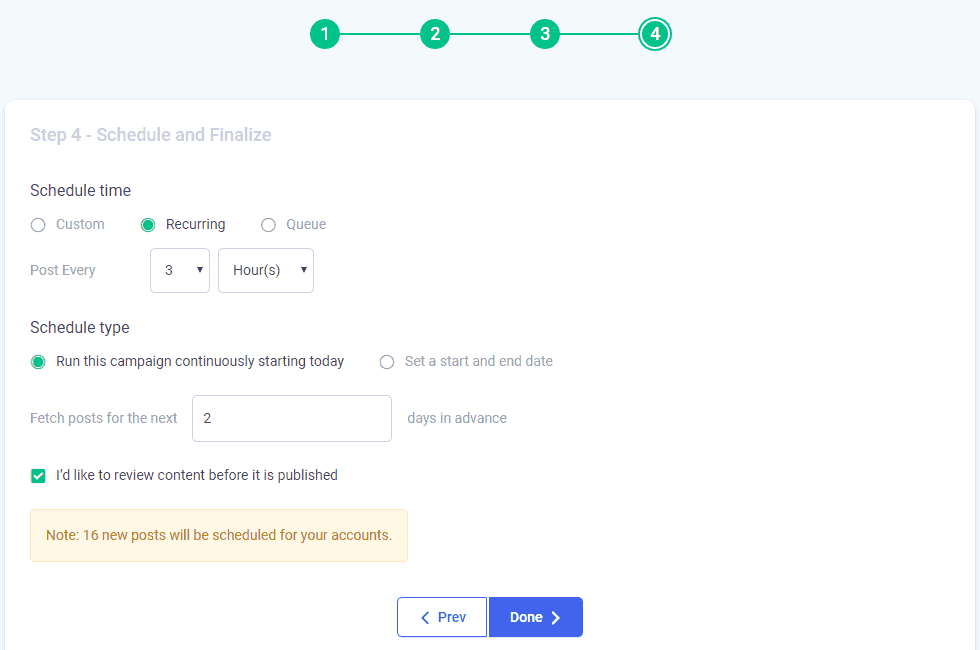
I recommend reviewing content before publishing to ensure your targeting is correct and the content is relevant, and of the quality you need. (for a few days at least)
One essential matter for high engagement on social media automation campaigns is sharing trending news with relevant hashtags. Also, timing is the key. Select the “Custom” option under “Schedule Time” if time is related and create time spots. Make sure the Timezone is also correct. Use an online time zone converter to find the right times.
ContentStudio is the best social media automation tool I have found so far.
How to create an automation campaign for the blog
Finding relevant content for your niche blogs is hard. In fact, if you’re running a niche blog for a specific audience, for example, people who are interested in Cookery in Albania, you have found good quality content to write and then write for Albanian people.
It does get complicated if you have multiple niche blogs. You have to manage them one by one, optimize them for search engines, submit them for search engines, gather content to share, etc.
However, with ContentStudio’s blog automation recipes, you can automate these processes everything from the ground.
You never have to worry about what content to write on your niche blogs.
However, I don’t recommend using blog automation tools for your authoritative blogs. Here’s how to automate your blog post creation process with ContentStudio.
You can either start creating automation campaigns to publish videos or articles on your blog. In this example, I will explain how to automatically post content on your blog.

Enter a descriptive name for your blog automation campaign and select relevant blogs. (If you choose WordPress, make sure your self-hosted WordPress blog is connected to ContentStudio rightly so ContentStudio can publish content for you.)
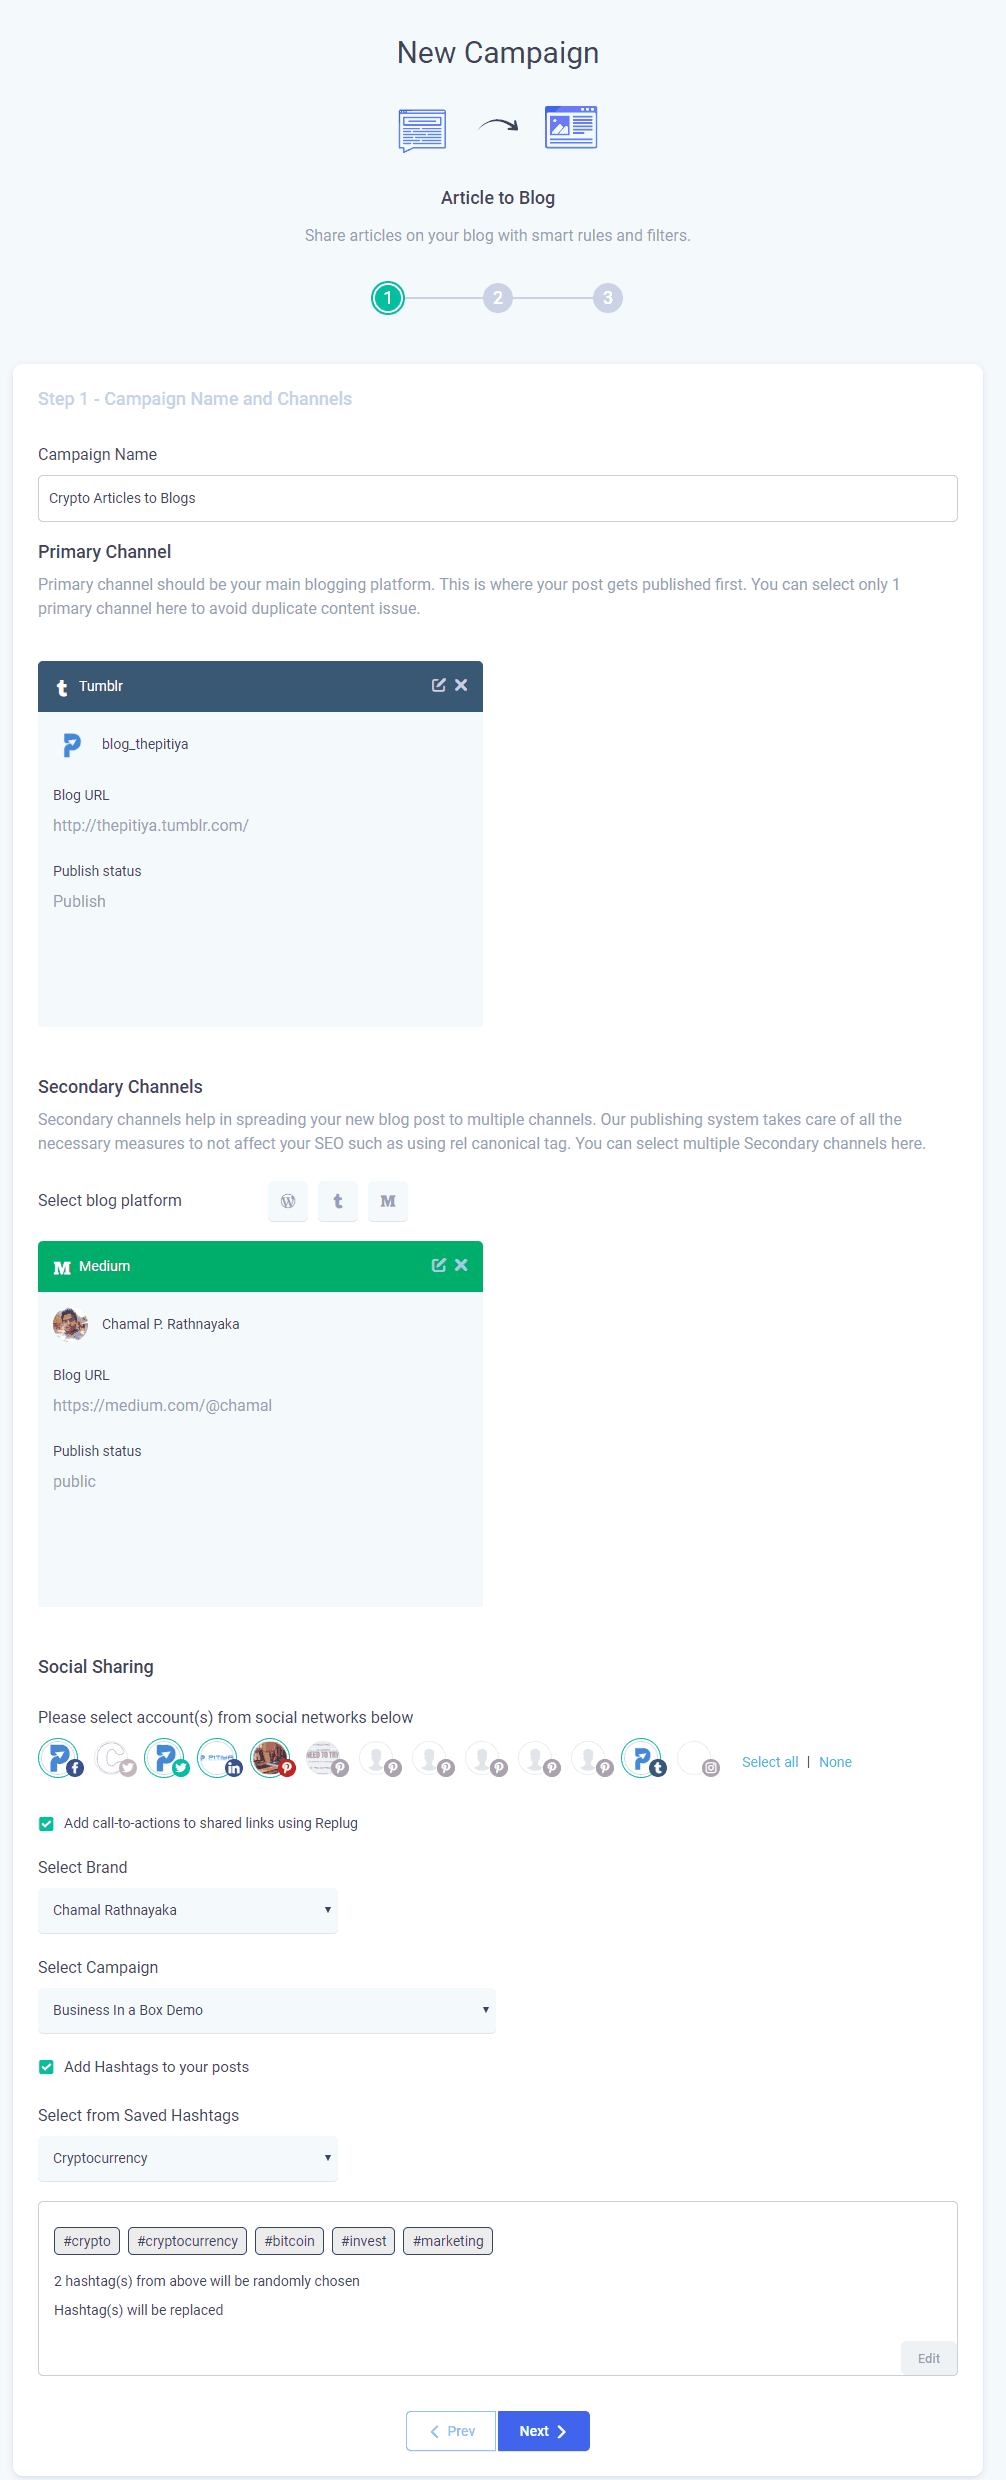
The steps are self-explanatory. Select your blog and social channels and set up Hashtags and Replug link settings.
I loaded the content from a custom topic I have already created. You can create custom content matching filters specific to this particular campaign separately.
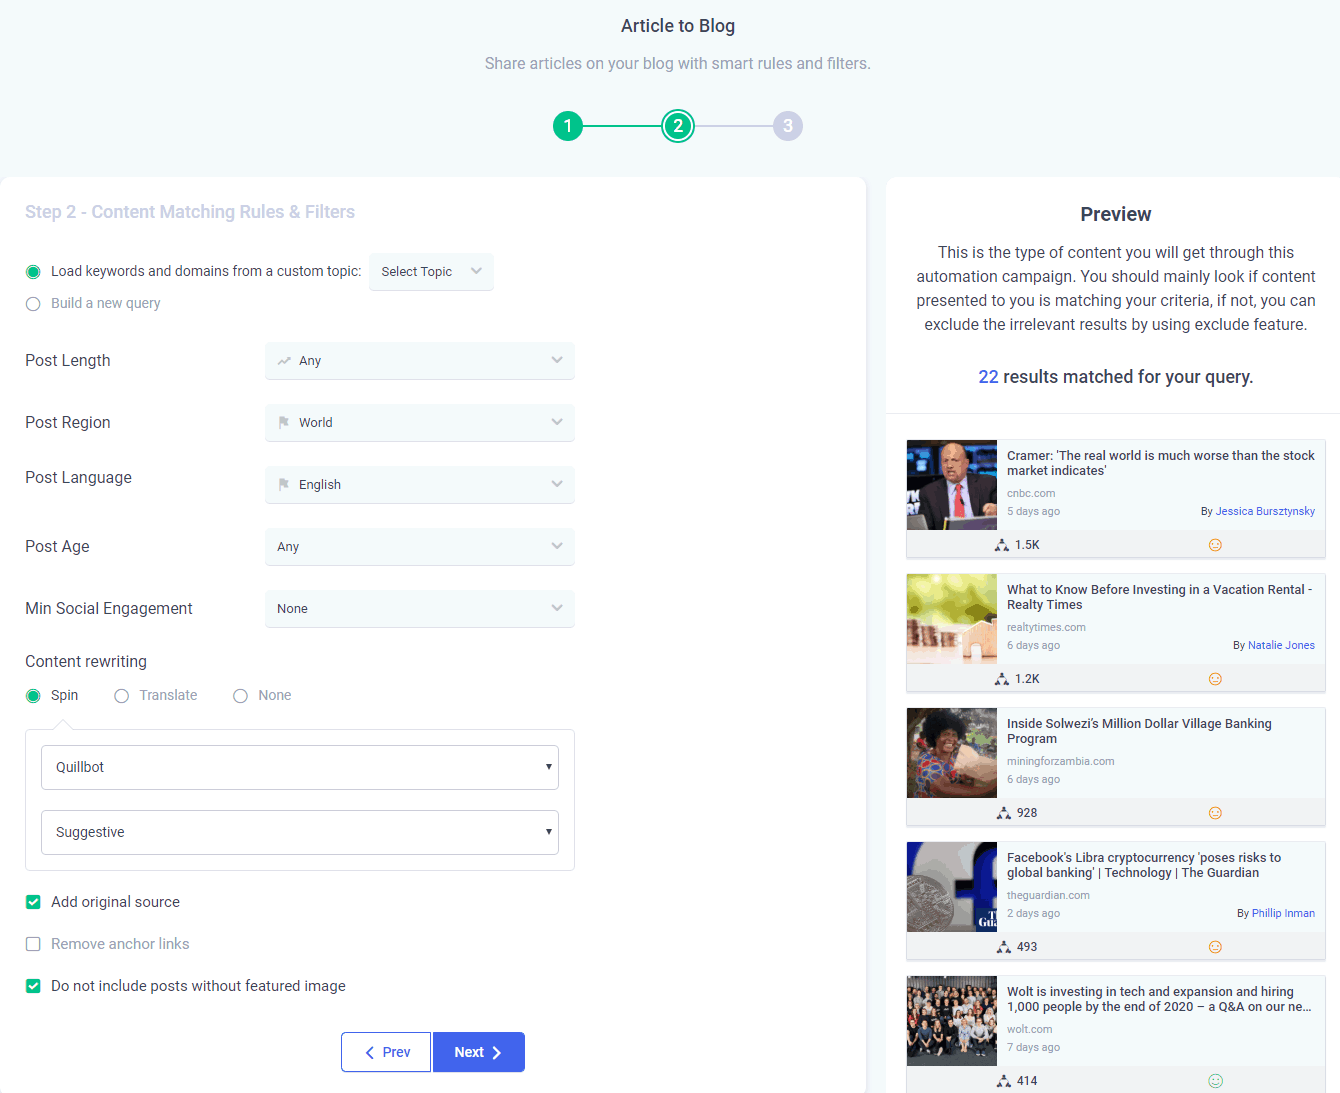
Currently, ContentStudio isn’t supporting custom link embedding. However, you can use a plugin like ThirstyAffiliates to hyperlink keywords automatically. (Tip: automatically embed Amazon affiliates links to generate revenue)
Set up timings for your campaign in the third and the last step. I recommend making your blog posting natural by diversifying content types (ex: videos, text articles) and topics. Hence, share blog posts on a specific topic at certain intervals.

Select the “I’d like to review content before it is published” tickbox if you’d want to review content before publishing.
How to create an evergreen post campaign
One headache you might be falling in should be rescheduling or reposting old blog posts on your social networks. If you manage multiple websites and they have hundreds or thousands of blog posts, it becomes more challenging to reshare blog posts on social networks again.
Studies have shown that posting older blog posts on social networks improves your blog’s traffic and credibility.
Now, with ContentStudio, you can quickly set up Evergreen campaigns that will recycle social posts after their initial release.

Enter a name for the evergreen campaign and select profiles you want to recycle social posts, and in the third step, schedule time and cycle gap (time to wait until the next cycle starts).
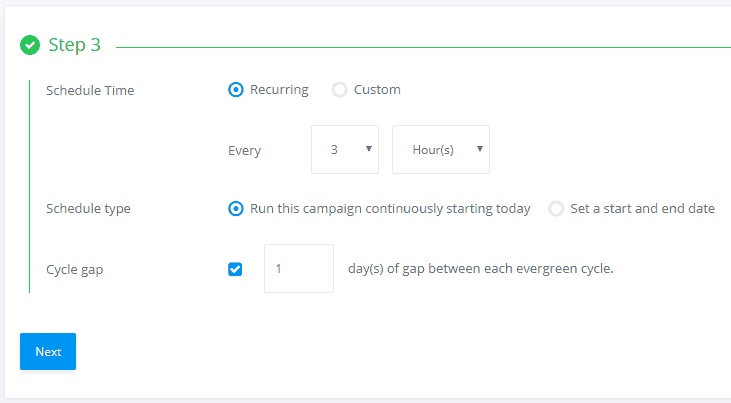
Create at least two (minimum) social posts to start recycling. You can drag and drop social media post boxes to set a posting queue.

Don’t forget to use relevant hashtags and different images to increase views for social media posts. If you’re a social media marketer or run a social media marketing agency, create different Evergreen campaigns for each project and/or client.
Twitter doesn’t allow recycling or repeating the same posts on Twitter. However, you can use add to Queue option in Step 3 and add different variations to get Twitter automated posting work for you.
View Existing Automation campaigns
Click on “view existing” under the automation recipes box.

Now you can activate or deactivate any automation campaign over here.

Planner
Once any social media post is scheduled, added to the queue, or published by yourself manually or by any automation campaign, those will be shown in ContentStudio’s planner tab.

In the ‘Calendar View,’ you can see all the social media posts with different statuses and types, such as repeat posts, Evergreen posts, automation posts, and bulk upload posts.
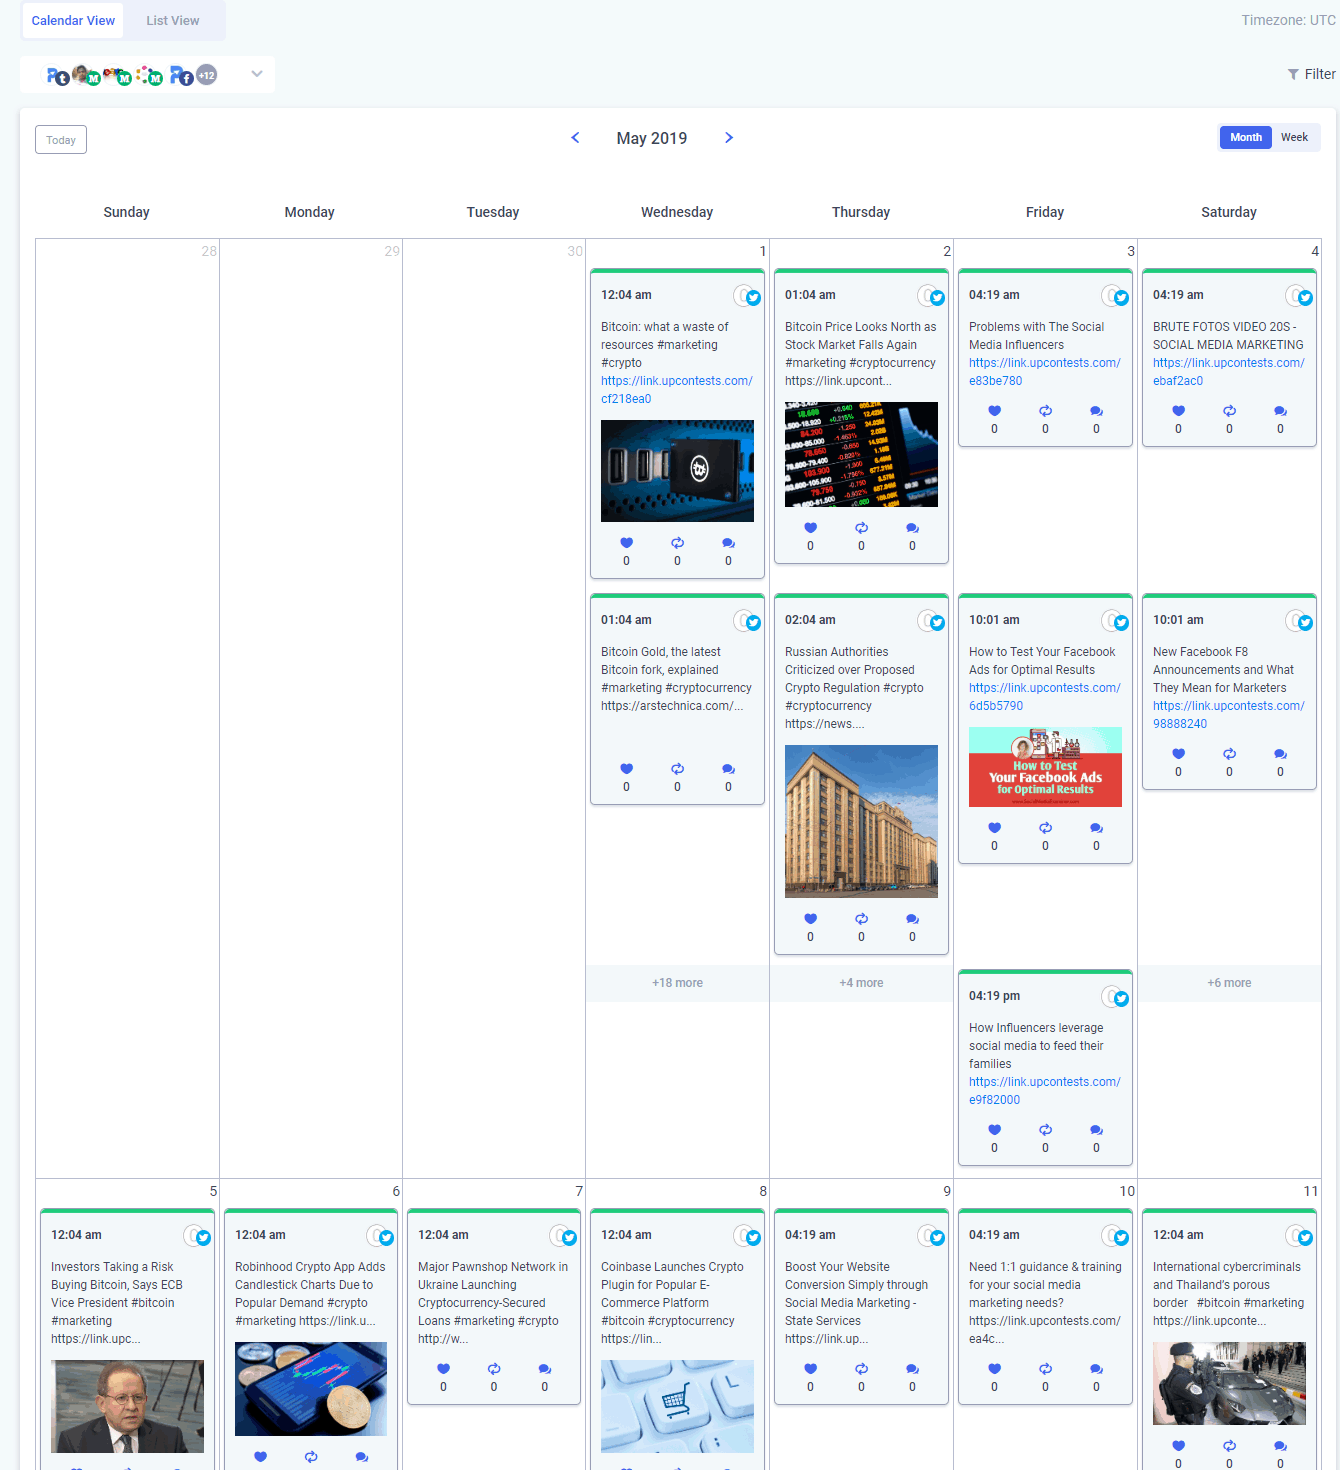
Managing your automated social media posts is easier. If you’re unsatisfied with any social media post, click the “replace” button to regenerate a new one.

Manage your published posts and see social engagements such as total likes, comments, and shares.

If you’re managing clients’ social accounts/profiles and hiring virtual assistants to manage your business’s social side, I suggest you try ContentStudio.
Social Inbox
Another key feature I want to discuss shortly in this review on ContentStudio is the Social Inbox.
If you have already used a tool like Hootsuite, you can now replace it and use ContentStudio instead.
Here are some benefits of the Inbox tool.
- Manage all your social accounts in one place.
- Assign conversations to teammates.
- Utilize social media effectively to support your customers
- Filter messages by private replies and public posts
- Saved responses to improve productivity and save time.
Social media networks such as Facebook measure how active your business is by how quickly you respond to customers’ queries. Now, with ContentStudio’s Inbox feature, you can save time and improve your productivity.
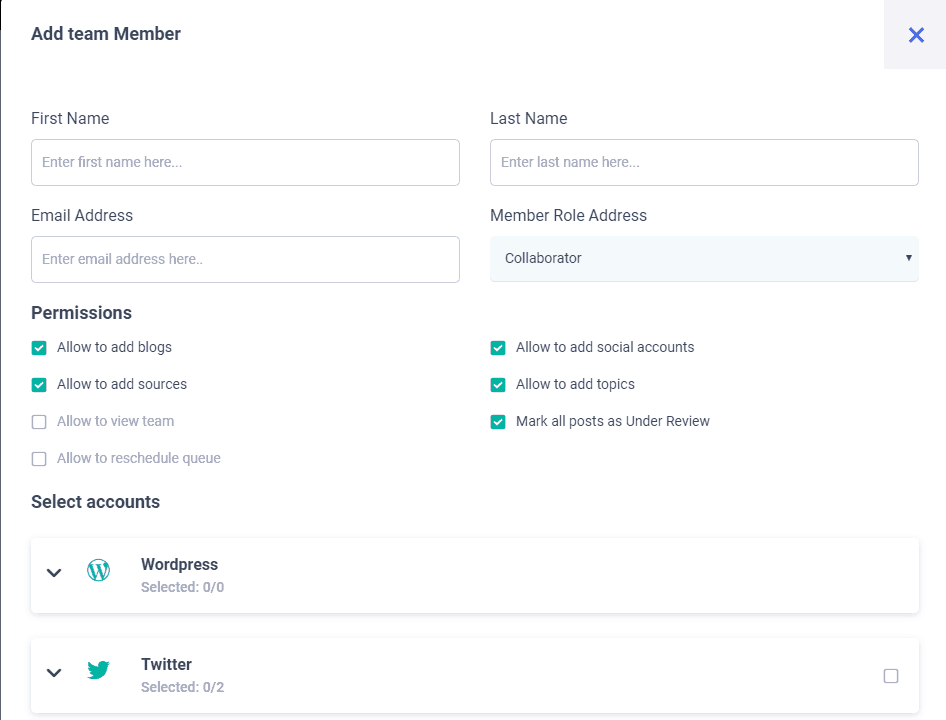
ContentStudio Team Management
ContentStudio has excellent team collaboration and workflow features if you’re running a medium-sized or large social media agency.
You can use those to limit access to specific functions, social media accounts, blogs & websites, and some critical pages of your ContentStudio account such as pricing, settings, etc.
Some of Content Studio’s team management features are.
- Specific tasks for social media account management to increase efficiency.
- Make posts made by team members under review.
- Assign a label to posts created by certain members for easier identification.
- Delegate certain social media accounts to specific team members (Collaborators) only.
Depending on your account’s limits, you can add team members as Administrators and Collaborators. Each position has different limitations and abilities.
ContentStudio Pricing
If you have read the ContentStudio review entirely, you will find that ContentStudio is one of the best social media marketing and content marketing tools out there. And there isn’t any reason not to give it a try.
As for different uses and purposes of the tool, many people in various fields, such as blogging, content marketing, SEO, digital marketing, and social media marketing, use ContentStudio.
Therefore ContentStudio has five different plans. Click here to check the most up-to-date version of the pricing and features page.
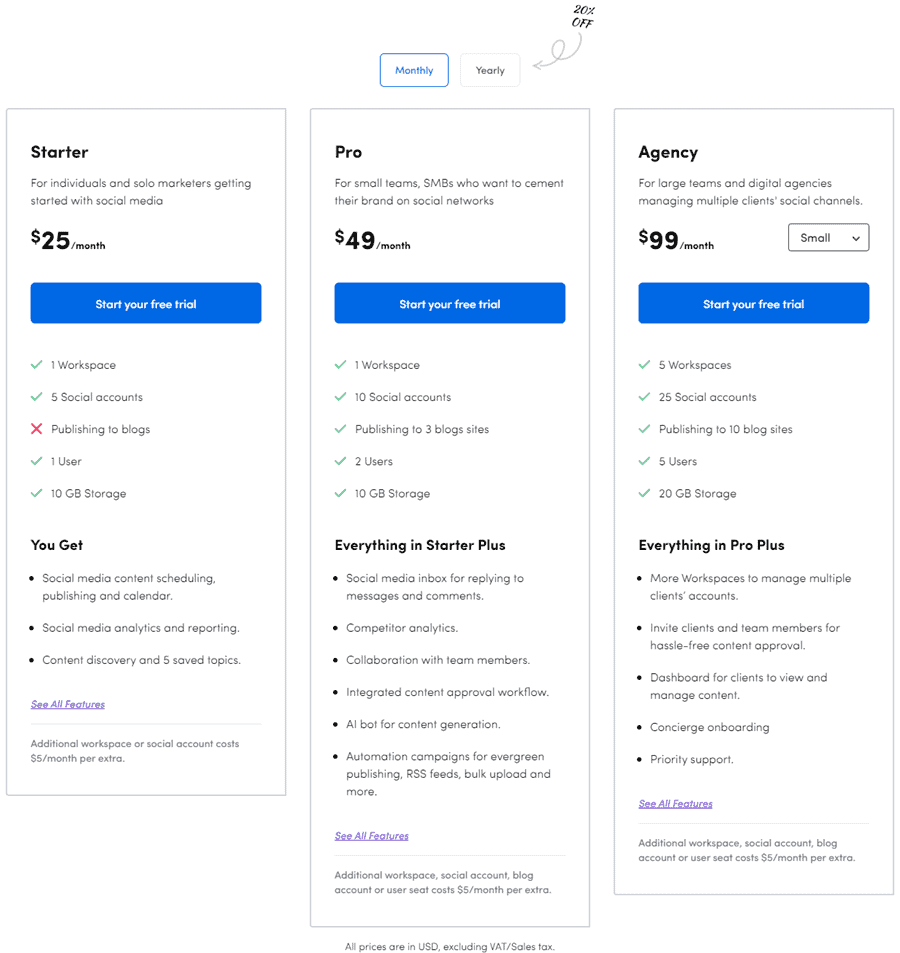
Click here to compare plans by features.
Discount
Now you can get up to 50% off any plan for life with the special offer. Here is the discounted pricing. Get your discount over here.

Do not miss this ContentStudio lifetime deal! Learn more.
ContentStudio Pros & Cons
In this complete ContentStudio review, I shared everything about how to use ContentStudio. Here are the Pros and Cons of ContentStudio I have found over three years of experience.
Pros
-
Proper onboarding for new users.
-
Workspaces to manage multiple brands
-
Email, live chat support
-
Integrations with lots of apps and services
-
Team management
-
Editorial calendar
-
Automation
-
Content Discovery
-
Robust social media and blog publication features
-
Direct Instagram posting
-
Influencer research
-
Evergreen posts module
-
Workflow and team collaboration
-
Replug Integration (display call-to-action buttons and forms in links you share online)
-
And much more…!
Cons
-
No BlogSpot blogging platform as a supported CMS
-
Neither TikTok nor Snapchat are supported
Note
Many features are on the roadmap of ContentStudio. Some features might already have been added at the time of your reading. Check out the additional resources section below to see links for the public roadmap and changelog.
Alternatives
ContentStudio is not the only one in the market. There are several tools like ContentStuduio for social media and content marketers. Some of them are:
- Hootsuite – One of the most popular SMM tools for content creators.
- Buffer – Another top-rated social media tool to share posts.
- Buzzsumo – Buzzsumo is an alternative to ContenttStudio’s Discovery feature.
- SocialBee
- Publer
- AgoraPulse
However, most SMM tools provide similar features such as post-scheduling, analytics, etc.
When comparing with ContentStudio’s competitors out there, you will get most for the money (or the value for money) in ContentStudio.
For example, you can find almost all features of BuzzSumo, Hootsuite, Buffer, Later, and MissingLettr services inside ContentStudio.
ContentStudio vs. Buffer vs. Hootsuite
Here’s a table of feature comparisons between Buffer, Hootsuite, and ContentStudio.
| Feature | ContentStudio | Buffer | Hootsuite |
|---|---|---|---|
| Content Discovery | Yes | No | No |
| Social Media Poster | Yes | Yes | Yes |
| Automation | Yes | No | No |
| Post to Blog | Yes | No | No |
| Post Planner/Scheduler | Yes | Yes | Yes |
| Social Media Influencers | Yes | No | No |
| Analytics | Yes | Yes | Yes |
| Social Inbox | Yes | No | Yes |
| Free trial | Yes | Yes | Yes |
| Chrome Extension | Yes | Yes | Yes |
Note: This table was last updated on 09th February 2021. Entries might be invalid at the current time you’re reading this Content Studio review. The comparison table will be updated soon.
Final Words on ContentStudio Review
I have used numerous social media marketing tools. I bet you, too, have.
I never thought there was a complete all-in-one tool for social media marketing and content marketing until I found ContentStudio.
I was blown away by seeing the features and simplicity of using ContentStudio.
ContentStudio can literally…
-
Handle all your social media marketing campaigns.
-
Find fresh, trending, and viral content for your social media pages.
-
Organize your social media posts nicely so you can clearly see which content is scheduled for which social pages.
-
Hand over your entire social media marketing campaigns for your virtual assistant or freelancer. Workflow and collaboration make it even easier by saving you and your assistant a ton of time.
-
Manage multiple social media pages with ease.
-
Control posting for microblogs and niche blogs. (Now, no need to worry about finding niche-related content)
-
Search engine optimizes your blog posts, so they not only rank them higher on SERPs but also receive lots of traffic.
-
AUTOMATE EVERYTHING!
Before ContentStudio, I used dozens of social media marketing tools. But, I was never pleased with any of them ever.
But, Now, I can tell that I am happy with ContentStudio and what it can do for my business. It’s just the start. More awesome features are to yet come, such as…
-
Curated email newsletter builder
-
AI assistant for social media post suggestions: Work less, get more!
-
Ability to monitor content from specific FACEBOOK pages in your topic feed
-
Discovering content from Instagram and Twitter
You can buy ContentStudio for just half the price you’d normally do over here. They are offering a 30-Days money-back guarantee so that you can ask for a refund if you are not happy within the period.
I am using their Agency plan. It is one of the best agency apps on my toolset.
What’s your favorite feature in ContentStudio? Share your opinions through the comment form below.
Additional Resources
What is ContentStudio?
ContentStudio is a social media and content marketing toolkit. It provides many tools and integrations to grow your online and offline businesses through content curation, social media marketing, influencers, and content discovery.
What is the ContentStudio Lifetime deal?
ContentStudio ran a couple of lifetimes promotional offers. When you buy the ContentStudio Lifetime deal, you will get access to ContentStudio.io for free.
If you want to find out more about the Content Studio Lifetime deal, check out their promo page (ContentStudio announces their Lifetime deals there) or send us a message.
- ContentStudio Roadmap
- ContentStudio Changelog
- ContentStudio Knowledgebase
- ContentStudio Support
- ContentStudio Facebook Group
- User reviews on ContentStudio on G2Crowd
- Affiliate Program
ContentStudio $49/Month
-
Social media marketing features
(5)
-
Discovery
(4.8)
-
Automation
(5)
-
UI & Usability features
(5)
-
Analytics
(5)
Summary
ContentStudio takes your social media and content marketing campaigns to a new level with its comprehensive features and inclusive data that refreshes daily. Influencer and blog posting modules would also make your life easier and save costs for other tools. If you are looking for an all-in-one tool to manage your content marketing and social media campaigns, ContentStudio is for you.
Pros
- Social Inbox
- Automation features
- Content feed
- AI content suggestions
- Advanced analytics
- Export data and reporting
- Mobile apps and browser extension
- Team management features
- Instagram posting
- WordPress plugin
- Value for money
Cons
- TikTok and Snapchat aren’t supported


This is awesome Chamal! Thank you for this in-depth review. I am able to use Content Studio more efficiently now.
You are welcome Jaff!
You will be amazed by seeing new features that are scheduled to be released in the ContentStudio V2.0. Stay tuned!
I am very new to blogging and products associated with blogging I am looking forward to getting to know and understand all I can about it. Thank you for the chance to win this great product.
Hi. I’m Jonah from Hashtagify.me. Thanks a lot for including us in your great article It’s great to hear that you find our service useful!:)
It’s my pleasure, Jonah! 🙂
I use social media everyday especially Instagram and Twitter. I would like to get meaningful followers, not just bots. Content Studio looks like a perfect fit for what I want to achieve.