
Visual content is the smartest way to convince your message to your friends, readers, and potential customers.
I don’t need to explain how important it is for you and your business to make attractive social media graphics for your campaigns.
Because if your graphic is poor, unattractive, and unconvinceable, your campaign becomes weak.
No need to say that as most people use visual content these days, it has become far harder to reach out to more of your followers or fans.
From a customer’s perspective, I usually spend more time on that post if I get more beautiful images. I will take my time to read and learn what the message is.
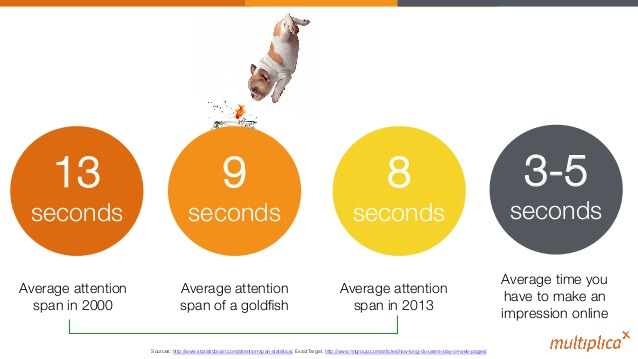
No need to explain the average internet user’s attention span time.
So, how do you catch up people’s attention within a few seconds and convince them to like, comment, react and even share your post among other social media users?
Yes, you can do that by designing beautiful graphics for social media networks such as Facebook, Pinterest, Instagram, Twitter, and LinkedIn.
So, without further ado, let’s learn how to design enticing images for Facebook, Instagram, and other social media as well. Yes, within a short period, effortlessly.
How to Create Beautiful Graphics for Social Networks: The Step by Step Guide
Nowadays, making social media graphics has become far easier than a few years before.
Nowadays, you can hire a freelancer to complete your graphic as your requirements. Hundreds of thousands of professional graphic designers in freelance networks such as Upwork, Freelancer, and Fiverr will make graphics as you expect.
However, as per the competition and the expensive fees, it’s tough to design graphics for every social network out there if you’re not with a million-dollar budget.
One solution is hiring a virtual assistant who handles all your social media management ventures. However, finding an honest, efficient virtual assistant these days is hard because you will have to spend more money on your VA.
I have been in the Internet Marketing field since 2012. And I have used all the methods mentioned above to create amazing social media graphics for my campaigns.
In that long way, I found an efficient, affordable, and suitable method to create graphics for any social network.
I used that method to design images for social networks and create graphics for blog posts and Banner advertising campaigns.
It is very efficient and flexible. But, the downside is that you have to design your graphic. So, if you’re suffering from a designer’s block issue, it would be somewhat difficult and harder for you to utilize this method at first to design graphics…
BUT,
As far as I can tell, this is the easiest and cheapest way around to make a social media graphic quickly within a short time.
Now let’s learn how to easily create images for Facebook, Instagram, Pinterest, and social media.
How to make Graphics for social media
Here are the steps you’ll have to follow to make attractive graphics for social media.

Step 1: Go to the Stencil website and Create your account. It’s free to create an account. However, in the free plan, you will get limited access to tools and features. For example, you’re allowed to create ten graphics per month.
So, I recommend you subscribe to one of their premium packages. Read this GetStencial App review article to learn more about this online graphic design tool.
Step 2: Once you have created your account, log into your Stencil account and open an online App to design graphics.
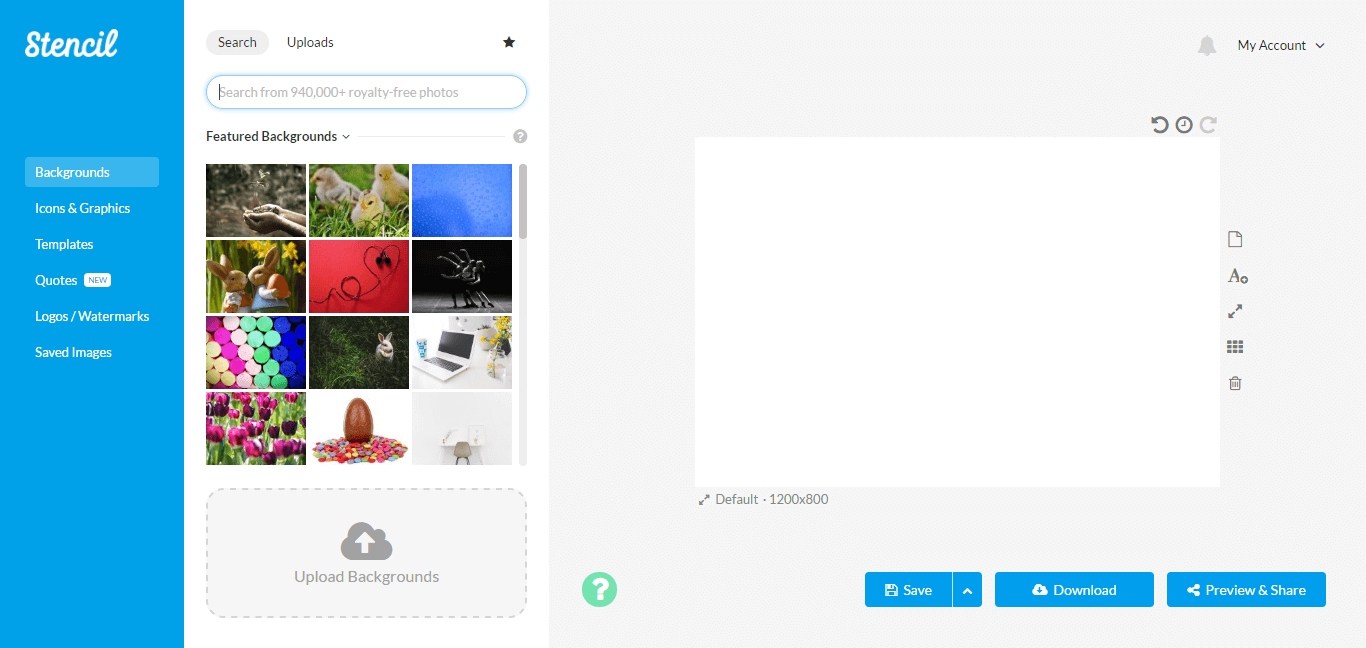
As you can see, there are a few tabs and links in GetStencil App. If you’ve any questions about using this online graphic maker, click on the question mark and watch videos. I am pretty sure that you’ll get accustomed to the Stencil App editor.
Here are common and important tools & features of the Stencil App.
- Royalty-free images under Create commas 3.0: You can choose from over 5,000,000 beautiful images for personal and commercial use.
- Upload Backgrounds: Use your images for your graphics. (ex: personal photo, company location photos, screenshots)
- Templates: Select one of 100s ready-made templates. Just choose and modify as you want!
- Quotes: Attach an exciting quote from over 100,000 famous quotes to your graphic according to the theme to improve the quality of the graphic.
- Logos/Watermarks: embed your website or company logo into the graphic. It will not only help in reducing content-stealing but also improve brand awareness.
- Saved Images: Save your graphics in the cloud to use or modify later.
- Share directly online: You can directly share your design on Facebook, Pinterest, Twitter, Instagram, and Buffer and also directly share the link to the image.
- Import fonts: Import and use custom fonts.
Step 3: You can start designing your graphic in two ways.
- Choose a Template and modify it.
- Start designing social media graphics from scratch.
Now first, let’s learn how to make beautiful social media graphics using templates.
How to Create a Social Media Graphic Using Pre-made Templates
1: Select Templates Tab.

2: Click on the “All” link and select your preferred social network for which you will make a graphic.

3: In this example, I chose the ‘Instagram’ option.

4: Now select the preferred graphic template for your chosen social network.

See the right-hand side to view the graphic template in the edit section.

As you can see, I can’t do much more to improve this graphic.
However, I will try to change the font styles of the quote on this graphic.

Why not? I will add a logo to my website. (You can also embed your social media profile as the watermark.)
5: Once you have edited your social media graphic, click on the “Preview & Share” button.

If your graphic is based on Instagram, enter your mobile phone number and click the “Send to Mobile” button. You will receive a message with a direct share link of your graphic to Instagram.
Awesome, right?
How to Create a Social Media Graphic From Scratch
Making a graphic for social networks from scratch is also easier. Here are the steps you’ll have to follow to create a graphic.
1: Select an equal canvas size for your graphic according to the social network.

2: Now, choose the right background image. Edit the background image if you have to.

3: Enter text and modify its appearance.

4: Once you’ve edited your image, you can save your graphic on your Stencil account to use later or save it as a template.

In last, click on the “Preview & Share” button. Then add a post description and select the correct Facebook page.
5: Click on the “Post on Facebook” button.
That’s it!
Conclusion
Designing graphics for social networks seems like a very frustrating and time-wasting task.
However, now you know how to design attractive graphics for any social network whenever you want.
The catch is coming up with good creative ideas and putting them into beautiful visual content.
Yes, it takes some time to make an excellent graphic design.
But it gets easier and easier as you progress.
Love what you do…
I am pretty sure; you can make impressive graphics for your social networking accounts.
Don’t forget to drop your comment below and do me a favor by sharing this article on your favorite social network.
Have a good day! 🙂
Good post i will try this out.thank you
Anne, Try this tool and let me know about your experience using Stencil App.